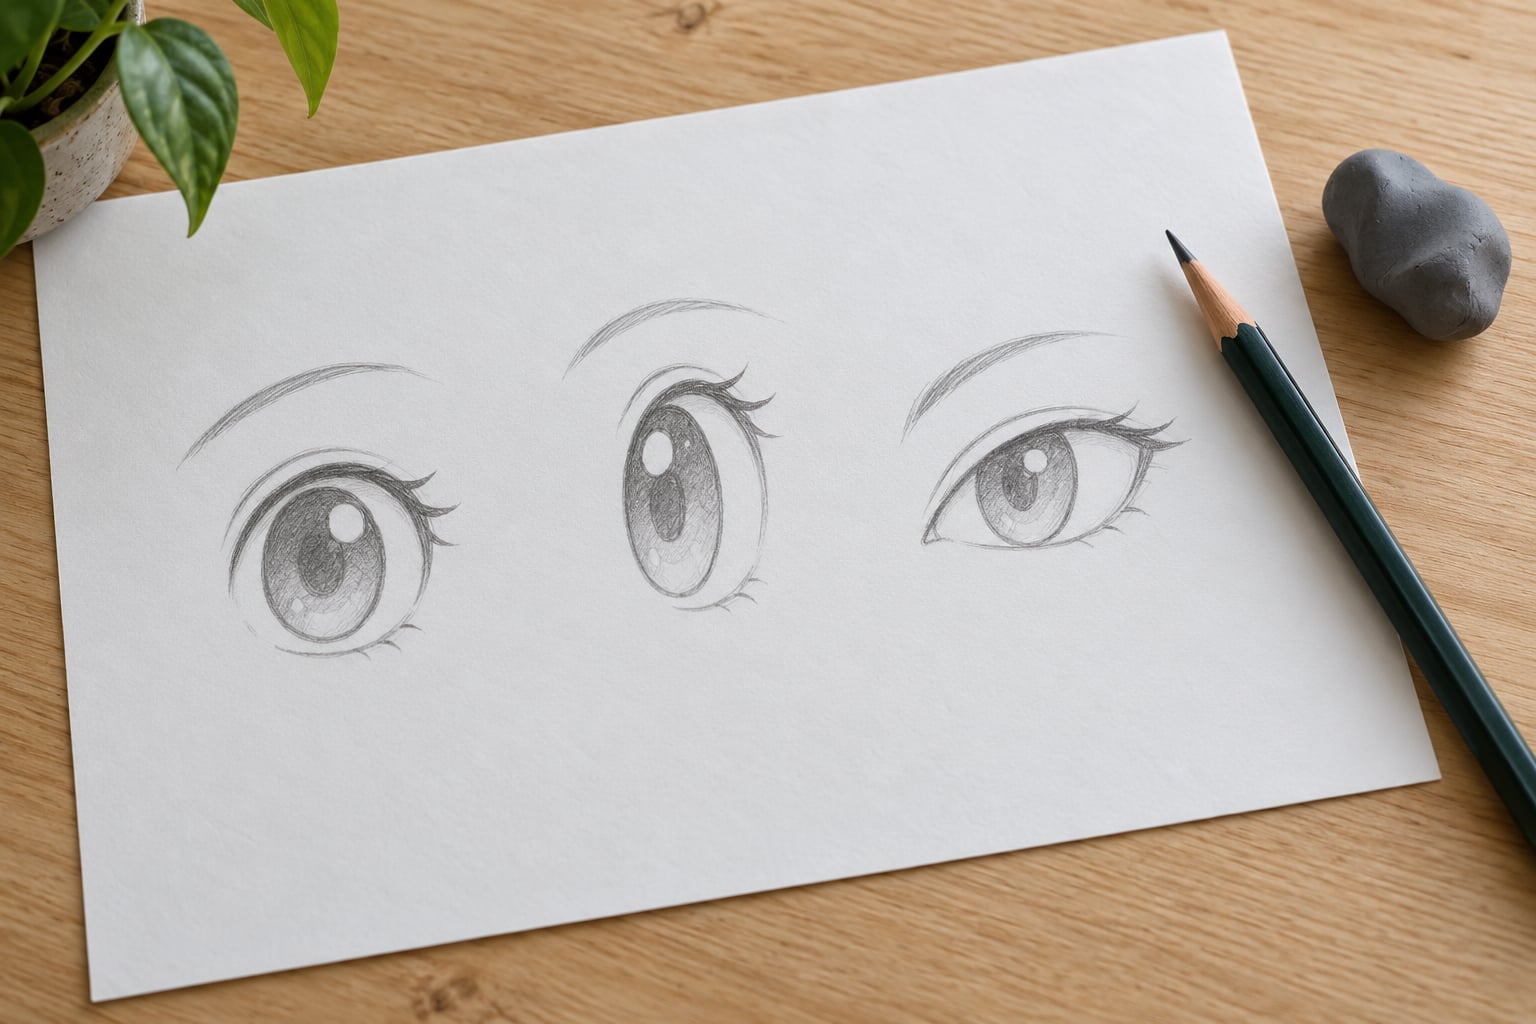
Most cartoon eyes don’t look wrong because the shapes are badly drawn. They look wrong because the pair disagrees with itself: the pupils point in different directions, the highlights sit on opposite sides, or the two eyes are spaced too close together. Once you fix four things — even spacing, matching shapes, a shared gaze direction and one consistent light source — the same drawing suddenly reads as finished.
This guide walks through how to draw cartoon eyes that look right in five steps, using nothing but a pencil and light construction lines that erase away cleanly. It works for kids on a printable practice page and for adults building a comic character, and every step explains how to tell when it worked.
Table of Contents
- 1What You Need
- 2Step-by-Step
- 3Step 1: Sketch the Eye Shape
- 4Step 2: Add the Iris and Pupil
- 5Step 3: Position the Eye on the Face
- 6Step 4: Refine the Expression
- 7Step 5: Add Highlights and Final Details
- 8Common Mistakes
- 9Frequently Asked Questions
- 10How do I make cartoon eyes look more natural?
- 11Should both cartoon eyes be exactly the same size?
- 12Where should the pupil go when a character is looking up?
- 13How can I draw different cartoon eye expressions?
- 14What is the easiest way to color cartoon eyes?
- 15Can I learn to draw cartoon eyes without a face outline?
- 16Conclusion
What You Need
You need very little, which is why this is a good first drawing project.
- Paper. Smooth cartridge paper takes an eraser better than newsprint. Cheap sketch paper is fine for construction lines.
- A soft pencil (HB or 2B) for the light guide work, plus a sharpened harder pencil (2H) for the final lines. A dull pencil smears the construction marks into the paper instead of lifting them.
- A vinyl or kneaded eraser. Kneaded rubber picks up graphite without leaving a shiny patch, which matters if you plan to ink afterwards.
- A ruler and, optionally, a compass for the centre line and matching eye sizes. Freehand is fine if you mark both eye shapes before drawing either one.
- Optional: a fineliner or gel pen for the lash line, and coloured pencils for finishing. Keep them off the page until the construction lines are gone.
Before you start, decide where the light in your scene comes from. Overhead window light, a lamp above and to the left, a low sun from the right — pick one and keep it. Deciding now saves you reworking both eyes later.
Step-by-Step
Step 1: Sketch the Eye Shape
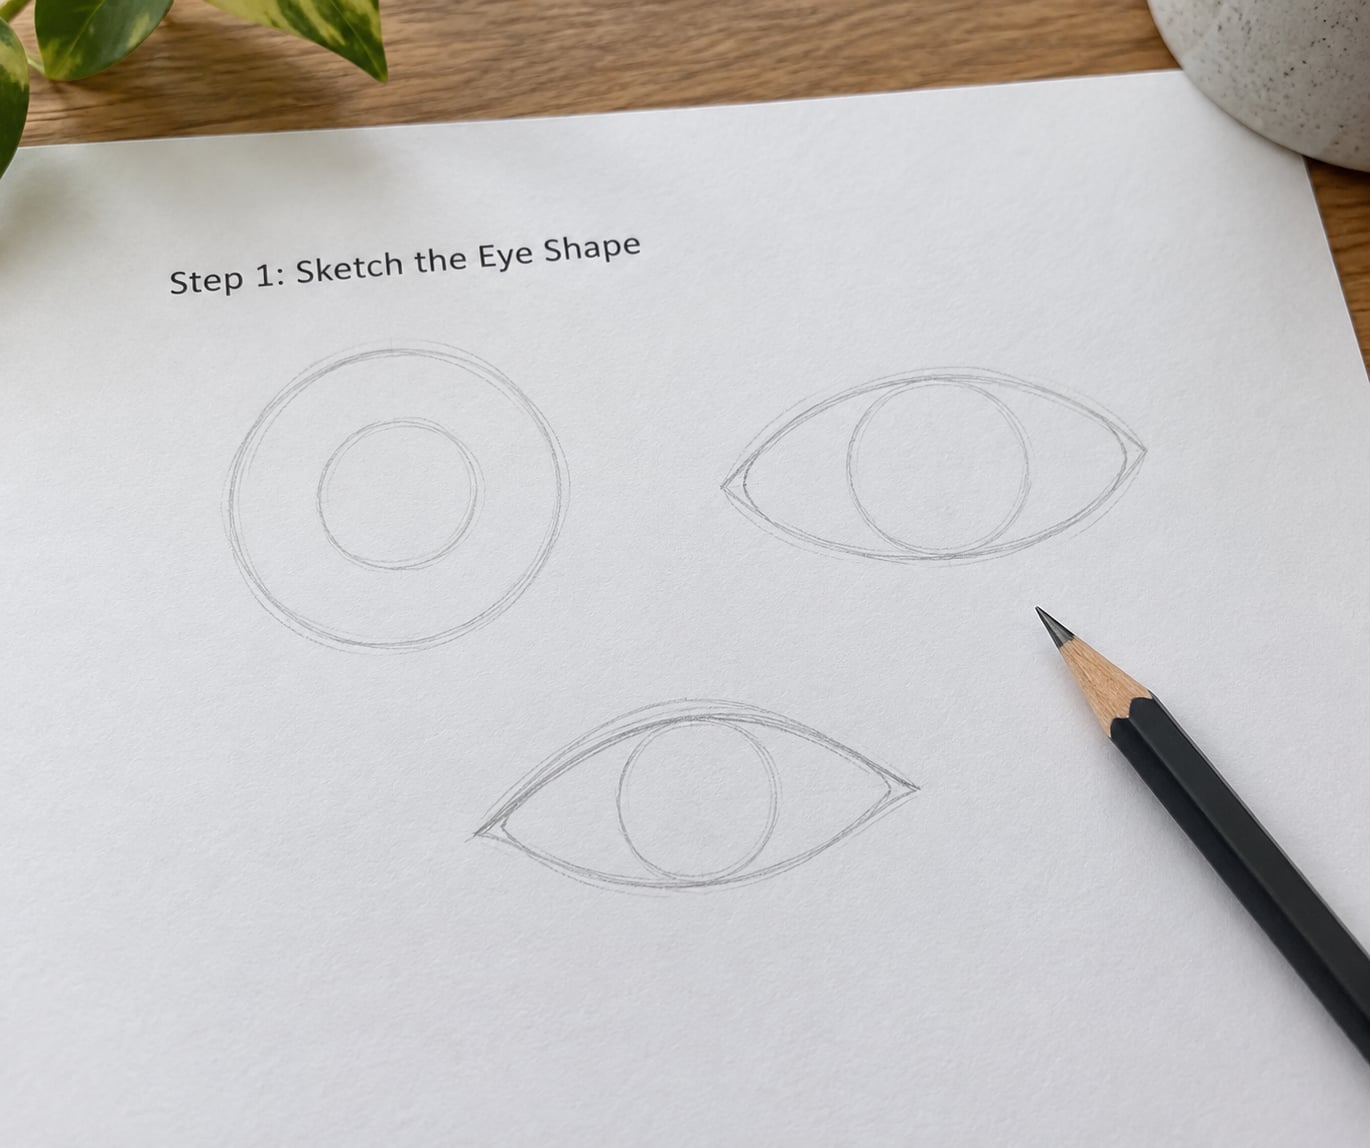
Start with one shape only — a circle, an oval, or a curved almond — and draw it as lightly as you can. If you commit to dark lines now, you lose the freedom to change the shape in the next ten minutes, and the shape is the part that carries the whole expression.
Circle gives you a wide, open, childlike look. Oval sits in the middle and reads as a friendly everyday face. Almond is the most mature of the three and the hardest for a beginner, because it depends on two curves meeting cleanly at the corners.
Light means you can still see the line under a heavy thumb. If you can barely read your own outline, it is light enough.
Step 2: Add the Iris and Pupil
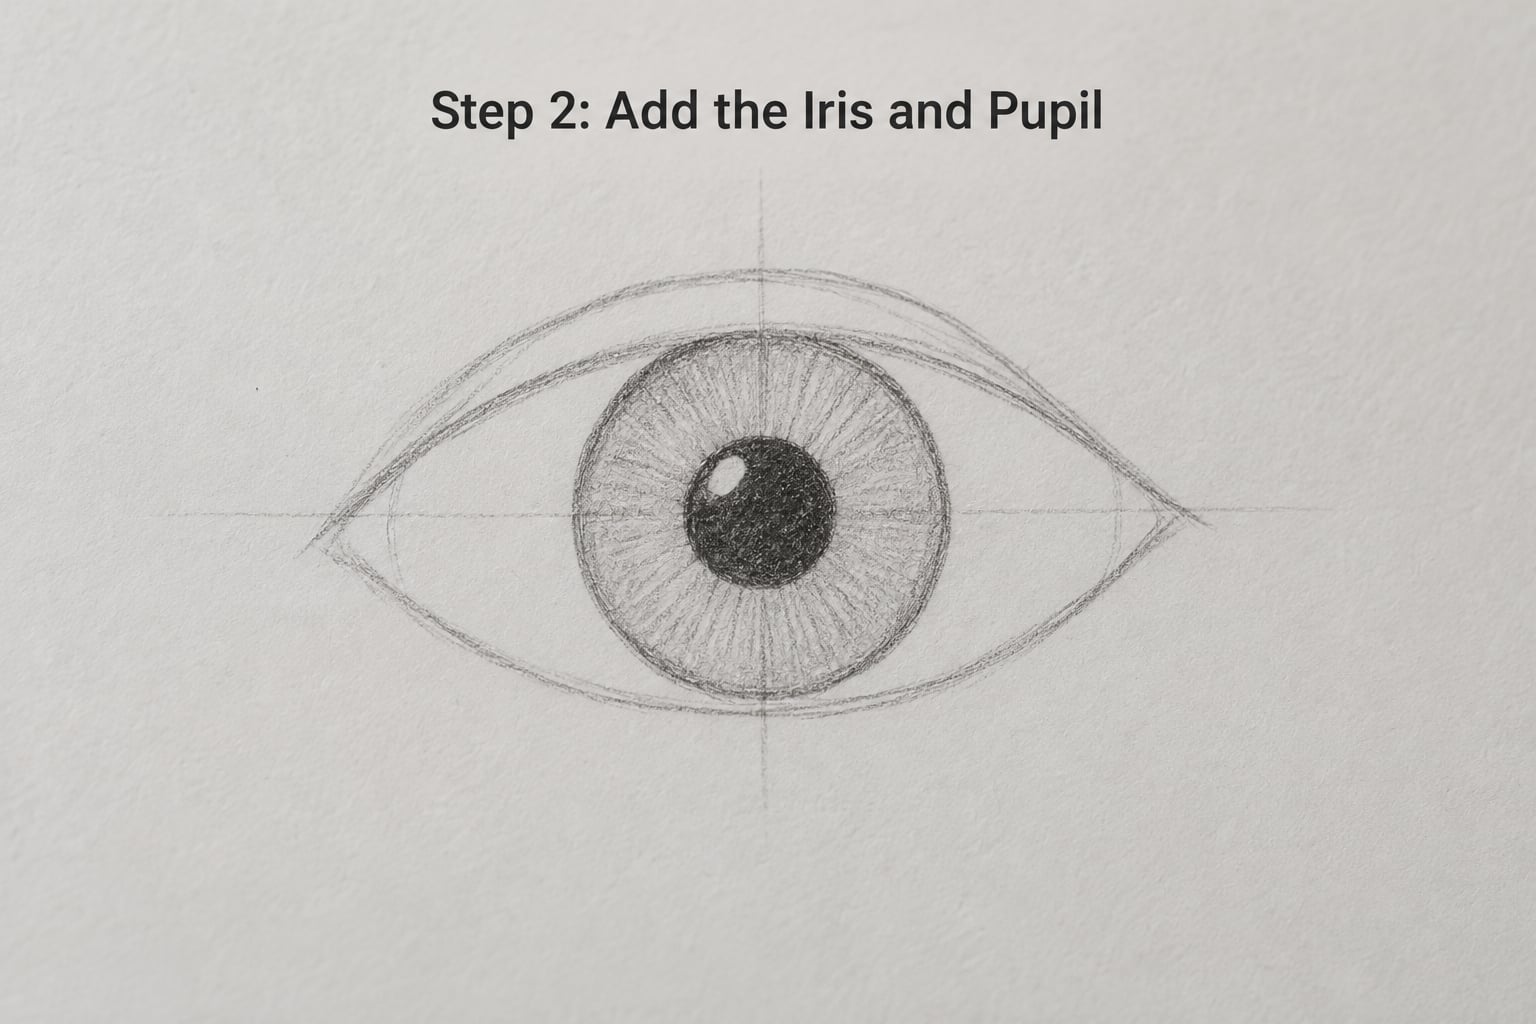
Mark a small cross in the middle of the shape, then draw the iris around it. For a beginner’s first attempt, make the iris large enough to touch the top and bottom lids — this is what gives classic comic and cartoon eyes their awake, alert quality.
The pupil sits in the middle of the iris and should be roughly a third of the iris width. A pupil that is too small makes the character look sleepy or stunned; one that fills the whole iris reads as a horror character. Either can be intentional, but know which one you are choosing.
How to tell it worked: squint at the eye. You should see one dark centre with an even ring around it, and the ring should be clipped by the lids rather than floating inside the outline.
One useful rule when you are learning how to draw cartoon eyes: place the pupil slightly high in the iris most of the time. Pupils drawn dead centre in every single drawing read as robotic, because real attention almost always sits a little above centre.
Step 3: Position the Eye on the Face
Placement is where beginners lose the most time and gain the least. Three measurements do most of the work.
- One eye-width between the eyes. Measure one eye from outer corner to inner corner, then leave that same width as the gap. Closer together reads as intense or startled; further apart reads as young or dopey.
- Eyes sit on or just below the vertical midpoint of the head. Divide the head height in half, then drop slightly. Eyes placed at the exact middle look flat and mask-like.
- Both eyes follow the curve of the head. If the head is a sphere, the outer corners of the eyes sit a touch higher than the inner corners. That small tilt is most of what gives a face its round, friendly read.
Light construction lines are what make this repeatable: draw the vertical centre line of the head, the horizontal eye line, and two light marks where the eye corners sit. Then draw the eyes between those marks. How to tell it worked: squint at your sketch and the eyes should be the first thing you notice, not the nose or mouth.
Step 4: Refine the Expression
Now change the expression without changing the underlying shape. Four controls do almost all of the work: eyelid weight, eye tilt, how much iris is visible, and eyebrow angle.
Make the upper lid thicker than the lower one and the eye reads as open and awake. Flatten or thin the upper lid and the same shape looks sleepy. Let the upper lid cut across the top of the iris and the character looks startled, because you are seeing more of the iris than normal.
Tilt is the fastest mood switch. Inner corners up reads happy. Inner corners down reads worried or suspicious. Straight and level reads neutral and often reads as slightly bored. Eyebrows do the same job with more range — raised and arched for surprise, flat and low for anger, a long shallow arch for worry.
| Eye shape | What it usually reads as | Best for |
|---|---|---|
| Circle | Wide-eyed, young, curious | Kids’ characters, mascots, comic shock |
| Oval | Friendly, neutral, everyday | Comic strips, storyboards, most beginners |
| Almond | Calm, mature, confident | Older characters, elegant or comic-book styles |
| Wide oval with cropped iris | Startled or alarmed | Reaction shots, surprise panels |
| Narrowed lens shape | Suspicious, annoyed, determined | Action scenes, skeptical characters |
| Rounded with heavy lower lid | Sad, tired, gentle | Soft or sympathetic characters |
Colours shift these meanings too. A dark iris with a small bright highlight feels intense; a light iris with a large highlight feels soft and young. If you want to move a cartoon character from cute toward semi-realistic, add a thin darker ring at the outer edge of the iris and reduce the highlight size before you change any shapes.
Step 5: Add Highlights and Final Details
One highlight, placed on the upper-left of both eyes if your light source is upper-left, does more for the drawing than any other single mark. The highlight is what tells the viewer where the light is, and the two eyes must tell the same story.
Keep the highlight inside the pupil or at the edge of the iris, near the lid on the lit side. A second smaller glint in the opposite corner reads as reflection and works well for glossy or wet-looking eyes, but add it to both eyes or to neither.
Then finish the line work. The upper lash line should be noticeably heavier than the lower, tapering thinner toward the outer corner. Eyelashes, if your character has them, grow from the lash line rather than floating above it. When you erase, remove every construction line and leave the eye slightly lighter than the jaw or hair, so the eyes stay the first thing the viewer lands on.
For colouring, fill the whites with white first and keep the flat colour inside the outline. Colour the iris a solid tone, add a slightly darker ring at the outer edge, then lay the highlight back on top with a white pencil or a correction pen. Coloring over the highlights and re-cutting them afterwards is what makes coloured eyes look cloudy.
Common Mistakes
Almost every beginner problem with eyes comes down to the two eyes disagreeing with each other. Here are the fixes.
- Cross-eyed or wandering pupils. The most common single cause of “wrong” cartoon eyes. Before drawing, mark the target direction on both irises and keep them identical. How to draw cartoon eyes that look right starts here more than anywhere else.
- Highlights on opposite sides of each eye. Unless the character is lit by two lamps, both highlights belong on the same side. Move one, not both.
- Even line weight everywhere. Eyes need hierarchy. Weight the upper lash line, thin the lower lid, and let the whites of the eye be the lightest area on the face.
- Two mirror-image copies instead of a matched pair. Real pairs vary slightly. Nudge one eye a fraction smaller or change the tilt by a degree or two, then accept it.
- Eyes too low or too close on the head. Move them up to the horizontal midpoint line and open the gap to one eye-width. This fixes more flat-looking faces than any eye detail does.
- Outlining everything heavily. A dark outline around the iris, the pupil and the eye shape flattens the drawing. Let the lash line carry the darkness and keep the iris edge softer.
- Pupils too small. They make the character look dazed. Enlarge the pupil and shrink the iris slightly, keeping the pupil roughly a third of the iris.
- Leaving construction lines in. Light guide lines are scaffolding, not detail. Erase them before you evaluate whether the eyes look right, because they pull the eye shape out of true.
Two quick checks catch most of it. First, flip your drawing upside down or step back and squint — misalignment shows up immediately. Second, cover everything except the eyes with a sheet of paper. If the pair no longer reads as a face, the problem is spacing, shape or gaze, not detail.
Frequently Asked Questions
How do I make cartoon eyes look more natural?
Check three things in order: both pupils must point the same direction, both highlights must sit on the same side, and the eye spacing must be one eye-width. Most lifeless-looking cartoon eyes fail one of these three, not the line work. Then thin the pupil slightly, add a darker outer ring to the iris, and keep the whites lighter than everything around them.
Should both cartoon eyes be exactly the same size?
Almost never. Perfectly matched eyes look like a sticker or a robot. Keep the overall size close so the face stays balanced, then vary one eye by a fraction — a slightly lower lid, a fractionally smaller iris, or a one-degree change in tilt. That small difference is what stops the pair looking mirrored.
Where should the pupil go when a character is looking up?
Push the iris up until it touches or nearly touches the upper lid, and let the lower lid show more white space beneath it. Looking down is the reverse: drop the iris toward the lower lid and let the upper lid cover more of it. Move both irises by the same amount so the gaze direction stays consistent.
How can I draw different cartoon eye expressions?
Change four things: lid weight, eye tilt, how much iris you can see, and eyebrow angle. For surprise, lift the upper lid off the iris and raise the brows. For anger, lower the brows, narrow the opening and tilt the inner corners down. For sadness, drop the inner corners and add a heavier lower lid. Keep the eye shape itself and vary the framing around it.
What is the easiest way to color cartoon eyes?
Fill the whites with white, colour the iris a solid tone, add a darker ring at the outer edge, then re-cut the highlight with a white pencil or correction pen on top. Colouring over the highlight and re-drawing it afterwards is what stops coloured eyes looking cloudy. Keep the colour flat and inside the lash line so the whites stay bright.
Can I learn to draw cartoon eyes without a face outline?
Yes, and it is good practice. Draw a row of eye pairs on a plain sheet and change one variable at a time: shape, spacing, tilt, gaze direction, expression. Ten pairs on one page takes a few minutes and teaches proportion faster than a single finished face, because there is nothing else competing for your eye.
Conclusion
Start with one thing: lightly sketch a single eye shape — circle, oval or almond — and leave the lines faint. Everything else in this guide, gaze direction, matching highlights, lash weight and spacing, is an adjustment to that shape, and none of it can be done if the shape is already inked in.
Then keep drawing rows of pairs and change one variable at a time. Ten tries across a single page teaches proportion faster than a finished portrait, and it is the fastest way to find which eye shape you actually like to draw. Start light, keep both eyes in agreement, and the rest follows.