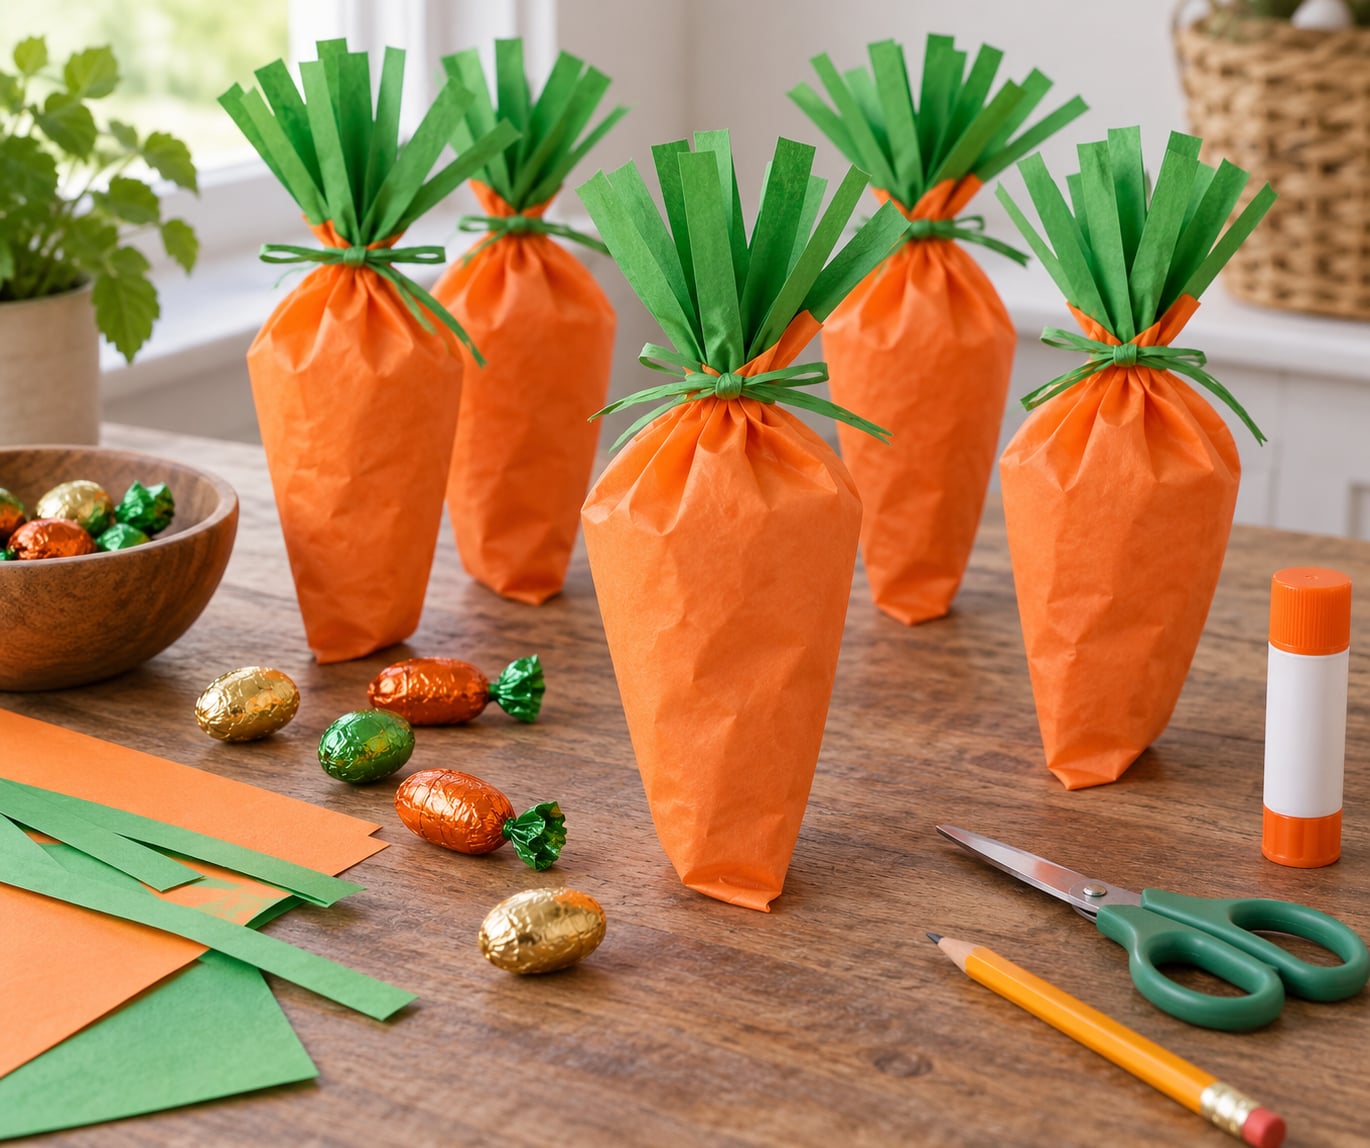
To make carrot shaped treat bags, you flatten a paper or fabric lunch bag, round the wide bottom into a carrot base, close the narrow top, then colour it orange and add a green top. The basic version takes about 15 minutes and needs no sewing machine.
I make a batch of these every spring. They started as a classroom project and turned into an Easter basket staple, mostly because a flat bag costs nothing and the finished shape survives being stuffed into a basket under a lot of tissue paper.
You can build one from a paper lunch bag, a fabric drawstring pouch, or a plain paper bag folded from a sheet of cardstock. The steps are the same either way; only the way it closes changes.
Table of Contents
- 1What You Need
- 2Step-by-Step: How to Make Carrot-Shaped Treat Bags
- 3Step 1: Choose and Prepare the Bag
- 4Step 2: Create the Carrot Body
- 5Step 3: Close the Narrow Top
- 6Step 4: Make the Carrot Look Orange
- 7Step 5: Add Green Carrot Tops
- 8Step 6: Decorate and Fill the Treat Bags
- 9Common Mistakes and Easy Fixes
- 10Tips for Carrot-Shaped Treat Bags
- 11Frequently Asked Questions
- 12What is the best bag to use for carrot treat bags?
- 13How do I make a carrot bag without sewing?
- 14How long should I let the paint dry before filling the bag?
- 15Can I reuse finished carrot treat bags?
- 16What can I put in carrot treat bags for toddlers?
- 17Why will my carrot bag not stand up on its own?
- 18Conclusion
What You Need
Start with a bag that is flat, rectangular and roughly 8 by 12 inches. A standard paper lunch bag works well and costs almost nothing. A muslin or cotton drawstring pouch works too if you want a bag that survives many Easters.
- Bag: one flat paper lunch bag, a fabric treat pouch, or two sheets of cardstock joined into a tube.
- Colour: orange crayons, orange markers, washable tempera paint, orange tissue paper, or orange fabric-safe paint.
- Carrot tops: green construction paper, craft foam, felt, yarn, ribbon, or green tissue paper.
- Closure: a pipe cleaner, a length of thin ribbon or elastic, or a small piece of tape. Paper bags can also simply be folded and taped shut.
- Decoration: stickers, googly eyes, glue dots, name labels, or a black marker for faces and details.
- Basic tools: scissors, a glue stick, a ruler, and a pencil for marking the fold lines.
If you are working with children, skip anything small enough to swallow. Skip googly eyes under age three, cut ribbon no longer than the bag is wide so there is nothing to loop around a neck, and use paper rather than beads or metal staples for anything a toddler will chew on.
For a no-printer option, draw your own template: draw a long triangle with a slightly rounded wide end on scrap paper, cut it out, and trace around it. That one template works for paper bags, felt and fabric alike.
Step-by-Step: How to Make Carrot-Shaped Treat Bags
Set aside 15 minutes for one bag, or about an hour for a dozen. The whole process is folding, closing, colouring and trimming.
Step 1: Choose and Prepare the Bag
Pick a bag that is flat and uncreased. Set it on the table with the open end facing up and the sealed bottom at the bottom, then press it flat with your palm so the sides lie square.
Fold the bag in half lengthwise and draw a light pencil line along the fold so the shape stays symmetrical. If the bag has a gusset at the bottom, flatten and tape it open first so the base folds cleanly. You will see the crease line run straight when you are done.
Step 2: Create the Carrot Body
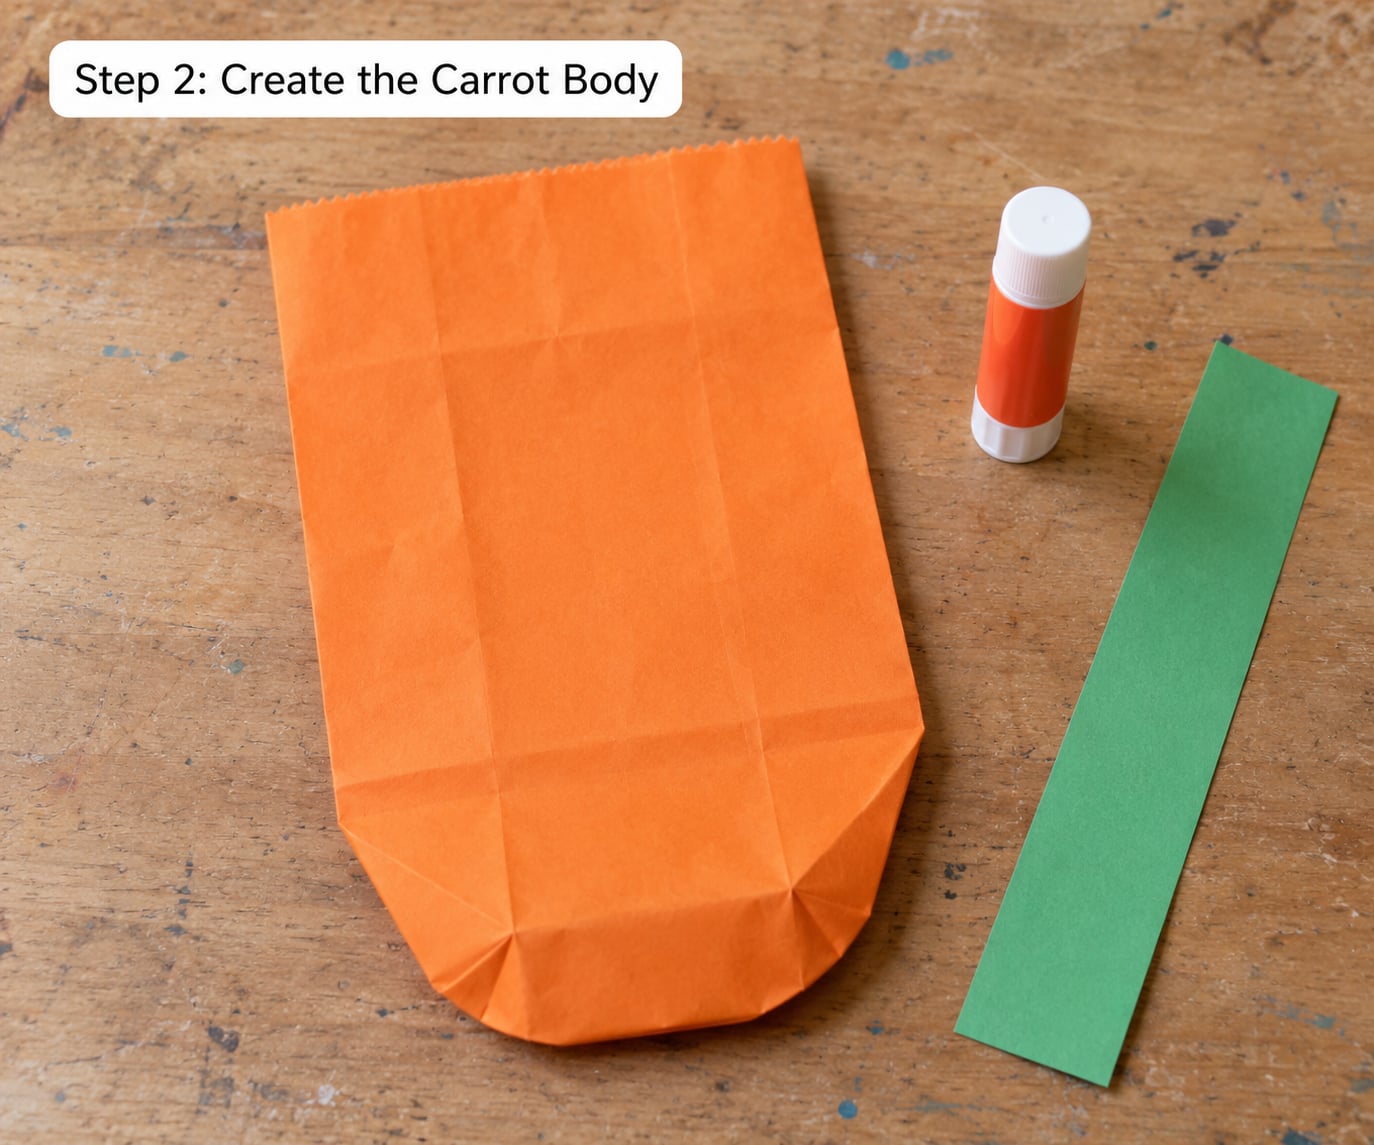
Turn the bag so the wide sealed end sits at the bottom, and bring the two lower corners up and slightly inward to round the base into the blunt tip of a carrot. A centimeter or two of overlap on each side is what makes it hold its shape.
Run a glue stick or a thin line of craft glue along the overlapping flaps and press them flat against the bag. You will see a soft, rounded point instead of a square corner, and the bag will stand on its own once you set it down. If it wobbles, add one more flap on the wider side.
For a paper version built from cardstock, cut two matching triangles, glue them right sides together along the slanted edges and leave the wide edge open. It is the same silhouette in two pieces rather than one folded bag.
Step 3: Close the Narrow Top
Gather the open end of the bag into a bunch, leaving a finger’s width of room so treats can still go in. For a paper bag, fold the open end over twice and tape it, then poke a small hole through the folded flap with a pencil.
Thread a pipe cleaner, a ribbon length or a piece of elastic through the hole and twist it to close the top. Leave a visible gap between the treats and the gathered neck, and make sure nothing tight enough to pinch is sticking out. A clean gather with the tie sitting above the contents means the bag is finished properly.
Kids under five usually do better with the fold-and-tape closure than with a threaded drawstring, which takes more fine motor control.
Step 4: Make the Carrot Look Orange
Colour the bag before you add anything inside it, while it is still flat and empty. Crayons and markers work on paper with no prep; on fabric, use a fabric-safe paint or felt pen. Washable tempera paint gives the most even colour but needs time to dry.
Cover from the blunt base up to the gathered top, keeping the strokes in one direction so the surface reads as a solid orange rather than a patchwork. Leave the very tip lighter if you want the gradient a real carrot has.
For a no-paint route, wrap the bag in a single layer of orange tissue paper and tape it on the back seam. It is fast and it wipes clean. Let paint or markers dry fully before filling, which takes 20 minutes for tempera and about two hours for fabric paint.
Step 5: Add Green Carrot Tops
There is no wrong way to do this, and the material changes the look completely. Cut green paper or tissue into fringed strips and tape them to the back of the gathered top for a feathery finish that reads as leaves.
Craft foam and felt give a sturdier top for reusable fabric bags; glue them in a fan around the neck. Yarn or green embroidery floss makes a scraggly handful of leaves that you tie around the drawstring. A loop of green ribbon is the quickest option and survives a wash.
You will know the top is right when the carrot reads instantly from across the room, without anyone telling you what it is.
Step 6: Decorate and Fill the Treat Bags
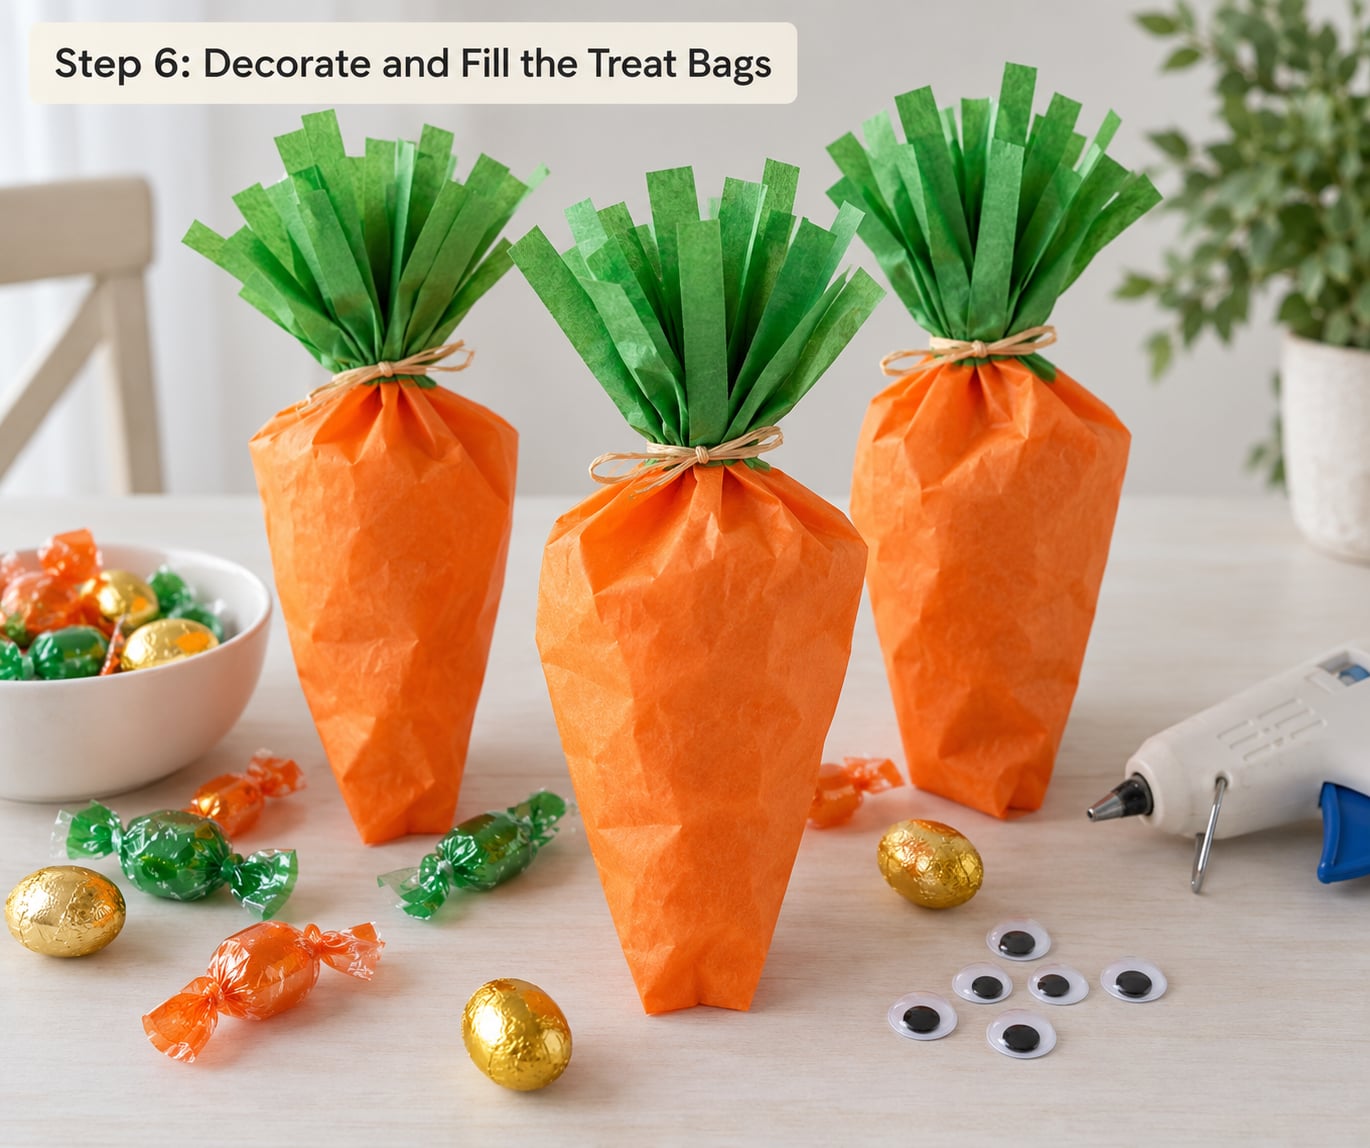
Decorate before you fill. Faces, dotted eyes, name labels and small stickers all go on while the bag is flat and empty, which is far easier than trying to reach inside later.
Fill with small wrapped sweets, stickers, mini puzzles, seeds, a folded note, or a handful of cereal. Keep pieces larger than about two centimeters for under-threes, and fill no higher than the base of the gathered top so the closure still shuts.
Fill each bag as a reward for the table, hand them out as party favours, or tuck them into an Easter basket as a reusable alternative to a plastic egg. If you are handing them to kids in a classroom, skip the sugar and use small toys or a seed packet instead.
Common Mistakes and Easy Fixes
The bag will not hold its shape. The lower corners usually need a bigger overlap. Unfold, widen the glued flap by a centimeter on each side, and press again with the bag resting under a book for ten minutes while the glue sets.
The top is too loose. Gather the neck a second time below the first tie. Two bands close a bag that one band leaves gaping, and it looks more finished too.
The paint bleeds through. One thin coat beats three thick ones. Blot rather than rub, and let each coat dry before the next.
The colour looks patchy. Colour along the grain of the paper in one direction and overlap each pass slightly. Crayons built up in a thin layer even out a patchy marker job.
The bag gets overfilled. Once the contents reach the base of the gathered top, stop. Anything higher pushes the tie open and the treats spill in the basket.
The base tears. Paper bags give out at the folded point. Double the base with a small patch of cardstock and glue it inside before you shape it.
Tips for Carrot-Shaped Treat Bags
Match the project to the age. Toddlers can colour pre-cut shapes and stick on foam leaves. School-age kids can do the whole thing with glue and crayon, and it takes them about twenty minutes. Older children can cut their own template, measure, and handle the drawstring themselves.
Make a second batch in fabric if you want them reusable. Cotton or fleece pouches wash in a cool cycle and come out usable for a second and third Easter, which is what most families end up wanting once the paper version is gone.
Store finished bags in a labelled box with the tops flattened so the green leaves do not crease. Fabric versions fold flat in a drawer; paper ones do not compress well, so stack them upright in a basket.
Personalise with a name written in black marker near the base, or a quick stitched initial on fabric. For a party, make one bag per guest as a favour. For a classroom, run it as a table activity and send the bags home as take-home gifts.
Upcycle what you already have. An old pillowcase square, a thrifted drawstring pouch, or a paint-spattered apron scrap all work, and a patchwork version reads as deliberate rather than homemade.
Frequently Asked Questions
What is the best bag to use for carrot treat bags?
A flat paper lunch bag in the 8 by 12 inch range is the easiest starting point. It costs almost nothing, folds into a carrot tip without fighting the material, and takes crayon or marker straight onto the surface. Fabric drawstring pouches work well too if you want a bag you can wash and reuse.
How do I make a carrot bag without sewing?
Use a paper lunch bag or two cardstock triangles. Fold or cut the wide bottom into a rounded tip, glue the overlap flat, then fold and tape the open top. A pipe cleaner or a ribbon threaded through a small hole gives you a drawstring finish. No machine and no needle needed.
How long should I let the paint dry before filling the bag?
Washable tempera paint needs about 20 minutes on paper and a little longer on fabric. Markers dry in a few minutes. Fabric paint takes closer to two hours. If you are in a hurry, fill the bag over an open hand for the first minute so nothing drags across wet colour.
Can I reuse finished carrot treat bags?
Paper bags are single use, though they can go in the compost bin. Fabric or felt versions wash in a cool cycle with the closure left open, and most last for several Easters. Air them dry rather than wringing them, and reshape the base with your fingers while damp.
What can I put in carrot treat bags for toddlers?
Skip candy and anything small enough to be a choking hazard. Good fillers are large wrapped biscuits, a sticker sheet, a small wooden shape, a seed packet, or a plastic scoop from a sandbox set. Fill only to the base of the gathered top so nothing pokes out at the neck.
Why will my carrot bag not stand up on its own?
The base needs more overlap than most people give it. Unfold it, widen the glued flap by about a centimeter on each side, and press it again with something flat and heavy on top for ten minutes. Paper also creeps when it is damp, so keep it away from wet paint while it sets.
Conclusion
Start by flattening one paper lunch bag and folding its lower corners into a rounded tip. That single fold is what turns an ordinary bag into a carrot, and everything after it is decorating.
Colour it orange, add a green top in whatever material you have on hand, and fill it with something small and wrapped. Once you have the shape down, a batch takes no longer than making a pot of tea.