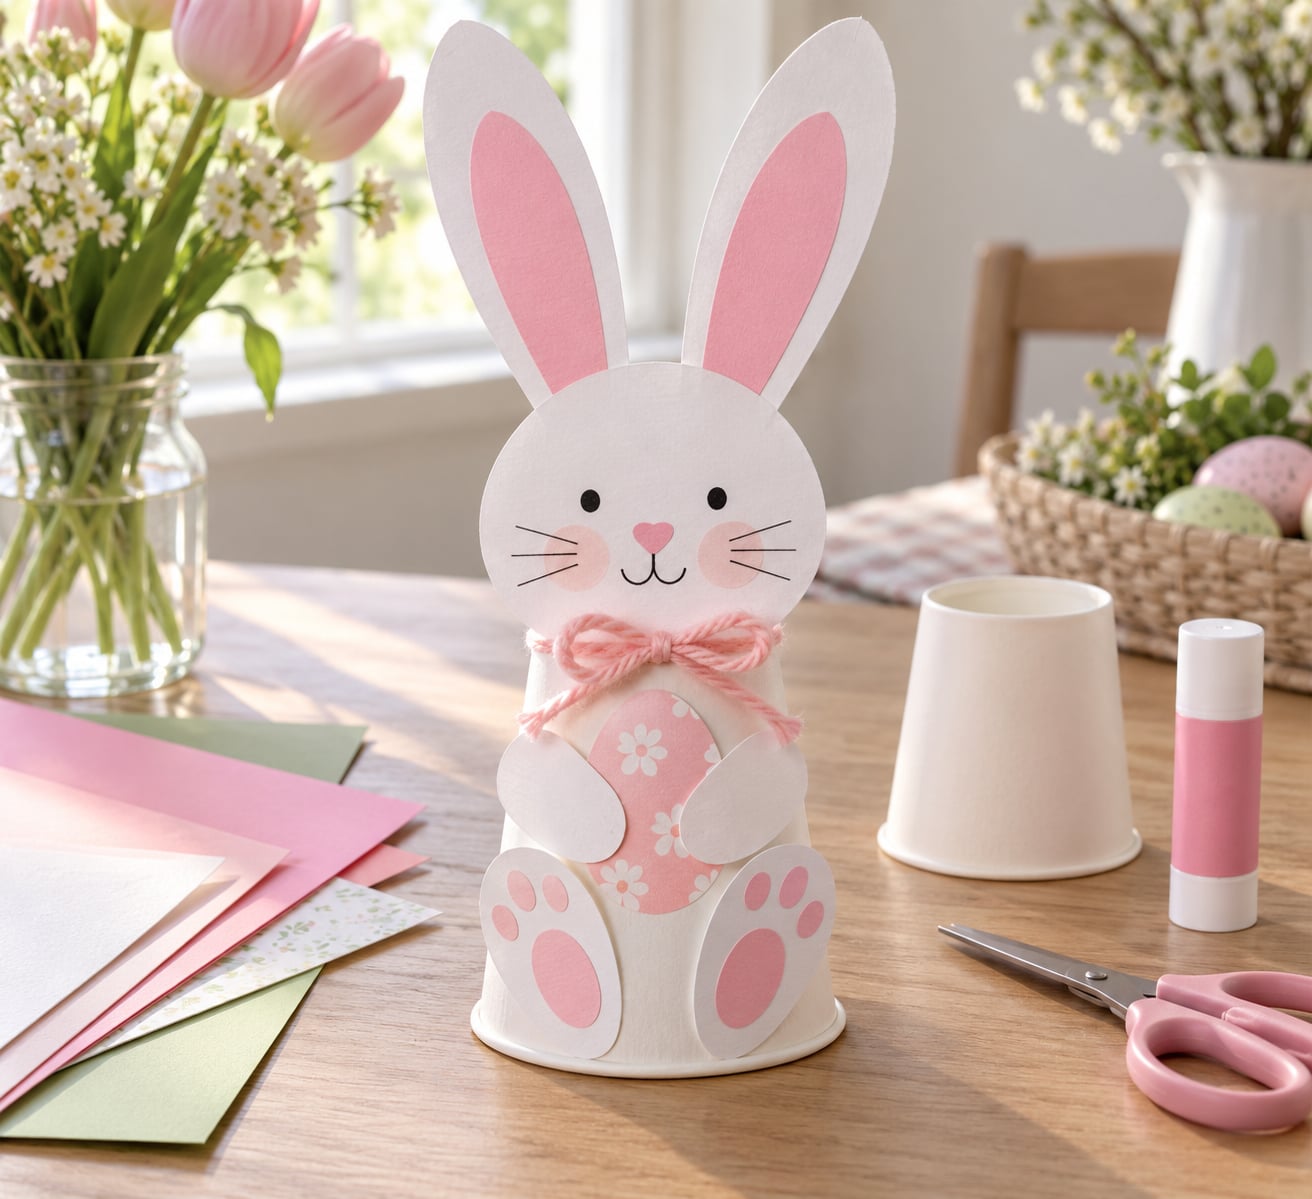
To make an Easter bunny craft with kids, you need one sheet of cardstock, a pair of scissors, glue, two paper circles for the eyes and about 25 minutes. The bunny is built from a head circle, two long ears and a body shape that stand up on a small base, so a child as young as three can finish it with a little help and an eight-year-old can do the whole thing alone.
I run this one with my own kids every March. What matters isn’t the version you see online, it’s whether your child can actually complete it without getting frustrated halfway through, so I’ll flag every place where you can hand over less of the work.
Table of Contents
- 1What You Need
- 2Step-by-Step: How to Make an Easter Bunny Craft with Kids
- 3How to Make an Easter Bunny Head and Ears
- 4Add the Face and Bunny Details
- 5Build the Body and Finish the Craft
- 6Customize the Easter Bunny Craft
- 7Common Mistakes
- 8Tips for Crafting with Kids
- 9Frequently Asked Questions
- 10What materials do I need to make an Easter bunny craft with kids?
- 11Can children make this paper bunny craft without adult help?
- 12How long does the Easter bunny craft take?
- 13What can I use instead of scissors or glue?
- 14How can I make the bunny craft easier for toddlers?
- 15What can I use to decorate the Easter bunny?
- 16Make It a Spring Tradition
What You Need
Here’s the full supply list for the paper bunny. Everything except cardstock, glue and scissors is optional decoration.
- Cardstock, 2 sheets — regular construction paper works for the body, but cardstock holds up better in the ears.
- White glue or a glue stick — a glue gun is unnecessary here and not safe for younger hands.
- Scissors — blunt-tip scissors for ages three to five.
- Two circles, roughly coin to golf-ball sized — cut from paper or use two buttons you already have.
- Pink paper — for the inner ears and cheeks.
- Black marker or pencil
- Optional: a small paper cup cut in half as a base, yarn for the bow, pipe cleaners, a pom-pom for the tail, googly eyes, felt scraps, stickers, washable paint.
Two substitutions cover almost every shortage. If you’re out of googly eyes, hand-drawn dots work fine, and for kids who can’t yet manage fine motor control, tear paper by hand instead of cutting it, which takes a little longer but removes the frustration entirely.
Skip anything small enough to swallow for children under three. Pom-poms, small buttons and loose bells are the usual culprits, and googly eyes are the single most common choking hazard in crafts like this.
Step-by-Step: How to Make an Easter Bunny Craft with Kids
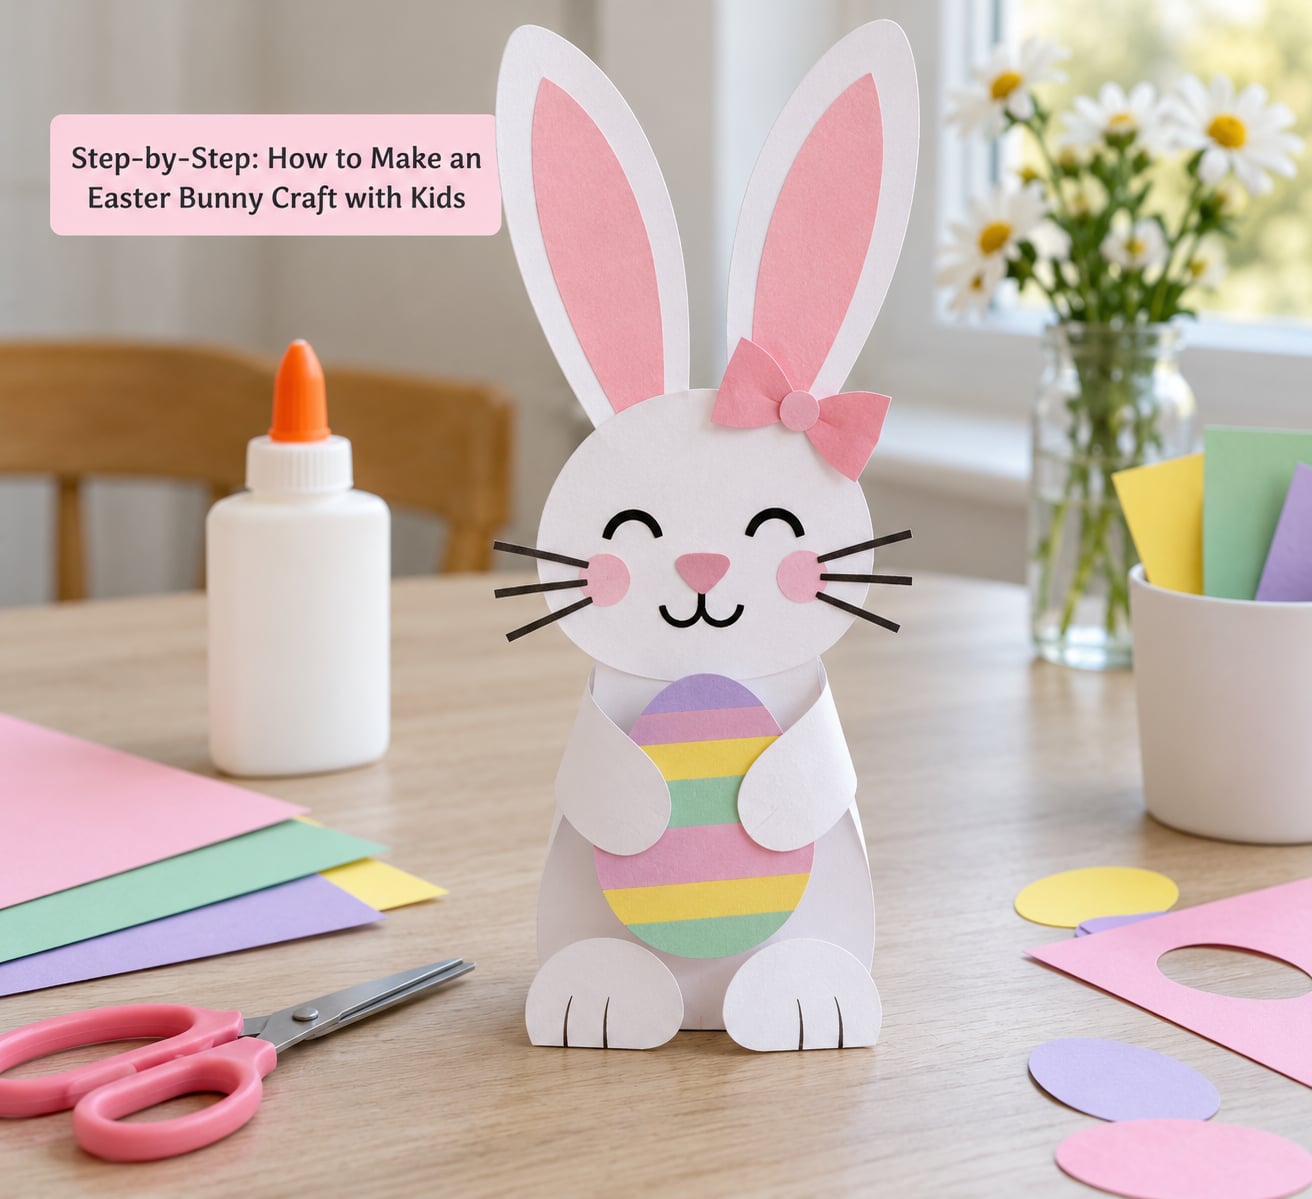
The finished bunny is a flat-backed character about 8 inches tall, made of two long ear shapes, a round head, an oval body, paws and feet. The whole thing rests against a small curved base so it stands up on a shelf instead of lying flat.
Set out all the materials and cut the shapes first. Most of the difficulty in a craft like this comes from interruptions halfway through, so the twenty minutes of quiet cutting up front saves a lot of squabbling later.
How to Make an Easter Bunny Head and Ears
Cut one circle about 3 inches across for the head. Cut two narrow teardrop shapes roughly 1 inch wide and 5 inches tall for the ears, pointy end up.
Fold each ear lengthwise and crease it firmly with a thumbnail so it holds its shape. Cut a thinner teardrop from pink paper, about half the width of the ear, and glue it to the front face of each ear, leaving a white border all the way round.
Attach the ears to the top of the head circle, one on each side, angled slightly outward. Hold each one in place for 30 seconds while the glue grabs.
To check your work: the two ears should be the same length, sit at matching angles and lean about 10 degrees off vertical. If one sits lower, the finished bunny will look permanently lopsided, so fix it now rather than at the end.
Add the Face and Bunny Details
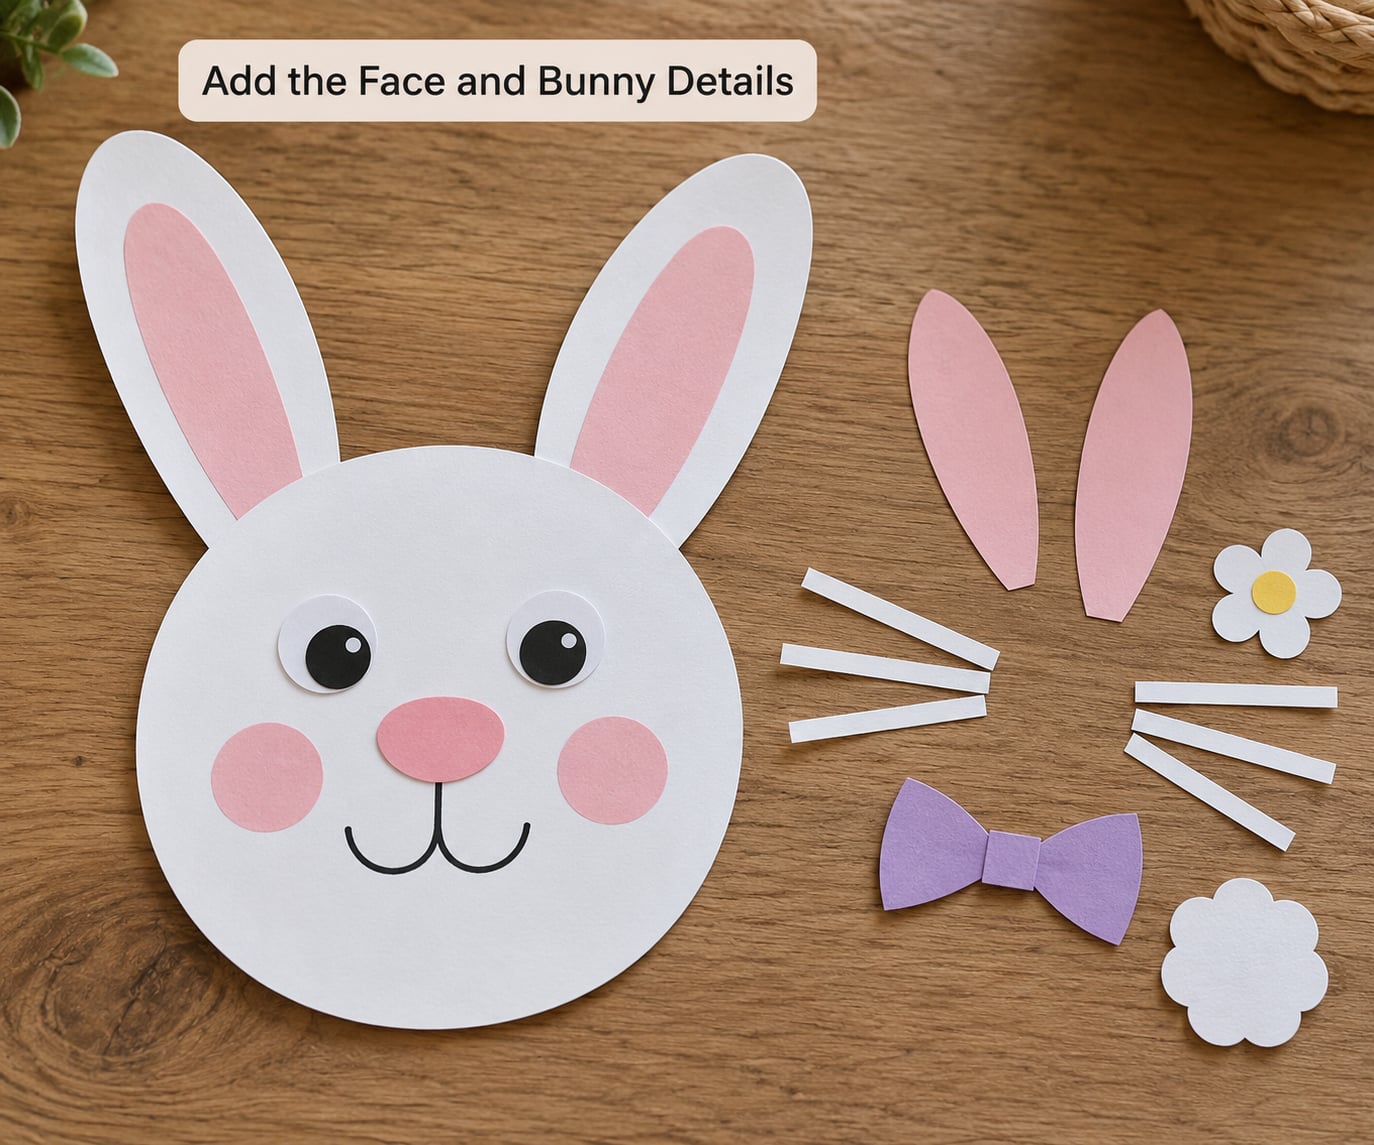
Glue two paper circles or googly eyes near the upper third of the head. Put a small pink oval nose between them and under, then draw a mouth that curves down and back up in two short lines.
Add two pink circles lower down for cheeks, cut from pink paper or stamped with a sponge. Whiskers are optional; three short strands of yarn taped behind the face read well and last longer than drawn ones.
For children who cannot yet draw a small mouth, draw the mouth yourself after gluing the eyes down. A toddler version works just as well with a single felt oval for the whole face, or with two fingerprints stamped in brown or black where the eyes go.
Build the Body and Finish the Craft
Cut an oval about 2.5 inches wide and 3 inches tall for the body, plus two small ovals for feet and two small circles for paws. Glue the feet to the bottom edge of the body and the paws to its sides.
Glue the head onto the top of the body so it overlaps by about half an inch. That overlap is what keeps the neck from snapping.
Add a bow at the neck. A short strip of yarn tied in a loop works and looks better than a flat paper bow.
For the base, cut a paper cup in half and glue the bunny to the curved half so it stands. A folded strip of cardstock bent into a curve works the same way, and a piece of recycled cardboard does too. Once it is standing, leave it somewhere flat and out of the way for 10 minutes while the glue dries.
Customize the Easter Bunny Craft
Now let your child take over. This part is where the craft actually becomes theirs, and the base construction barely changes.
- Fingerprint faces — thumbprint for the head, pink thumbprints for the inner ears. Best under age four.
- Paper shapes — cut-out flowers, hearts, eggs and clouds glued around the edges.
- Pom-pom tail — glue one to the lower back, with a generous dot of glue, since pom-poms shed fast otherwise.
- Tissue paper — layered on the body for a soft fur texture.
- Felt — a felt bow, felt feet or a felt collar.
- Painted background — a paper plate or cardstock circle with spring colours behind the bunny turns it into a display piece.
Keep it simple and resist adding another material mid-project. Two or three decoration types already make a finished piece that looks deliberate.
Common Mistakes
The ears fall over or sit at different heights. Measure them together before cutting rather than one at a time, and crease each fold twice with a firm thumbnail. Glue needs 30 seconds of pressure; a quick tap does nothing.
The head slides off the body. Overlap the two pieces by half an inch instead of butting them edge to edge, and use glue on the full join rather than three small dots.
The finished bunny won’t stand up. The problem is almost always the base, not the bunny. Test the base curve against the back of the body before gluing, and glue the base flat on the table first.
Decorations are placed too high or too low. Have your child mark positions with a pencil before gluing anything. Markers get erased; glued pom-poms do not come off paper.
Glue drips and dried blobs. Have a damp cloth or a wet wipe in your hand from the start, and work over a sheet of newspaper or a plastic tablecloth. White glue on cardstock will not lift once it dries.
Fine details go wrong for young children. If the face is the sticking point, swap drawn features for stamped or torn shapes. The craft works the same with less pressure on small hands.
Tips for Crafting with Kids
Do all the cutting first. Once assembly starts, uninterrupted quiet time is what makes the project feel like a project and not a chore.
Age-sort the job. Under three: tearing, stamping, glue-stick only. Three to five: blunt scissors, glue stick, big shapes. Six and up: real scissors, fine details, full assembly.
Cut glue-strip messes. For a younger child, squeeze white glue onto a paper plate and let them apply it with a cotton swab or a chunky popsicle stick. It takes the same amount of time and keeps hands and paper far cleaner.
Prep the night before. Most parents who enjoy this craft put the cut shapes in a bag or tray the evening before and spend 15 minutes the next afternoon on assembly and decorating.
Let decorating be independent. Step back once the structure is glued and let the choices be theirs, even if the result looks like something a different animal entirely.
Turn it into a 10-minute lesson. Ask which bunny is taller, compare the two ears with a ruler, or sort the paper scraps into a pile for recycling at the end. It takes almost no extra time and the kids rarely notice it happening.
Frequently Asked Questions
What materials do I need to make an Easter bunny craft with kids?
You need two sheets of cardstock, scissors, glue, a black marker and pink paper. Two small circles for the eyes and a small paper cup for the standing base are helpful but optional. Decorations like pom-poms, yarn, felt and stickers are entirely up to your child. Skip small loose pieces such as pom-poms, buttons and googly eyes if anyone crafting is under three.
Can children make this paper bunny craft without adult help?
Children aged six and up can usually complete the whole project on their own, including cutting and gluing. Ages three to five need an adult for the cutting, and anyone younger benefits from an adult cutting and gluing while they handle the tearing and decorating. A glue gun is never needed for this craft, which keeps the adult role limited to supervision rather than hot glue.
How long does the Easter bunny craft take?
Allow about 25 minutes of active time for a child aged four and up: roughly 10 minutes of cutting, 5 minutes of assembly, and 10 minutes of decorating. Add another 10 minutes if glue needs to dry before the bunny is displayed upright. Cutting the shapes ahead of time, the night before, brings the same project down to a 15-minute session.
What can I use instead of scissors or glue?
Tearing paper by hand works in place of scissors for small shapes, and pre-cut shapes suit children with limited hand control. Tape works anywhere glue does, though it holds less well on cardstock. For glue, a glue stick is the easiest swap, and a glue gun is never necessary for this project and should stay out of reach of young children.
How can I make the bunny craft easier for toddlers?
Cut every piece beforehand and hand your child only the gluing and decorating. Skip the drawn face and use two thumbprints for eyes and a torn pink oval for the nose. Leave out the pom-pom tail and any small loose decorations, which are choking hazards under age three. A paper plate behind the bunny makes a simple stand-in base if you want to skip the cup.
What can I use to decorate the Easter bunny?
Fingerprints, torn paper shapes, tissue paper, felt scraps, yarn, pipe cleaners and pom-poms all work on the same base construction without any changes to the build. For paint, washable markers and sponge stamping are cleaner than brushes and dry faster than wet paint. Stick to two or three decoration types so the finished bunny looks deliberate rather than busy.
Make It a Spring Tradition
Do the cutting the night before and let your child pick the decorations. Twenty-five minutes, one sheet of cardstock, and a bunny that stands up on the shelf afterwards.