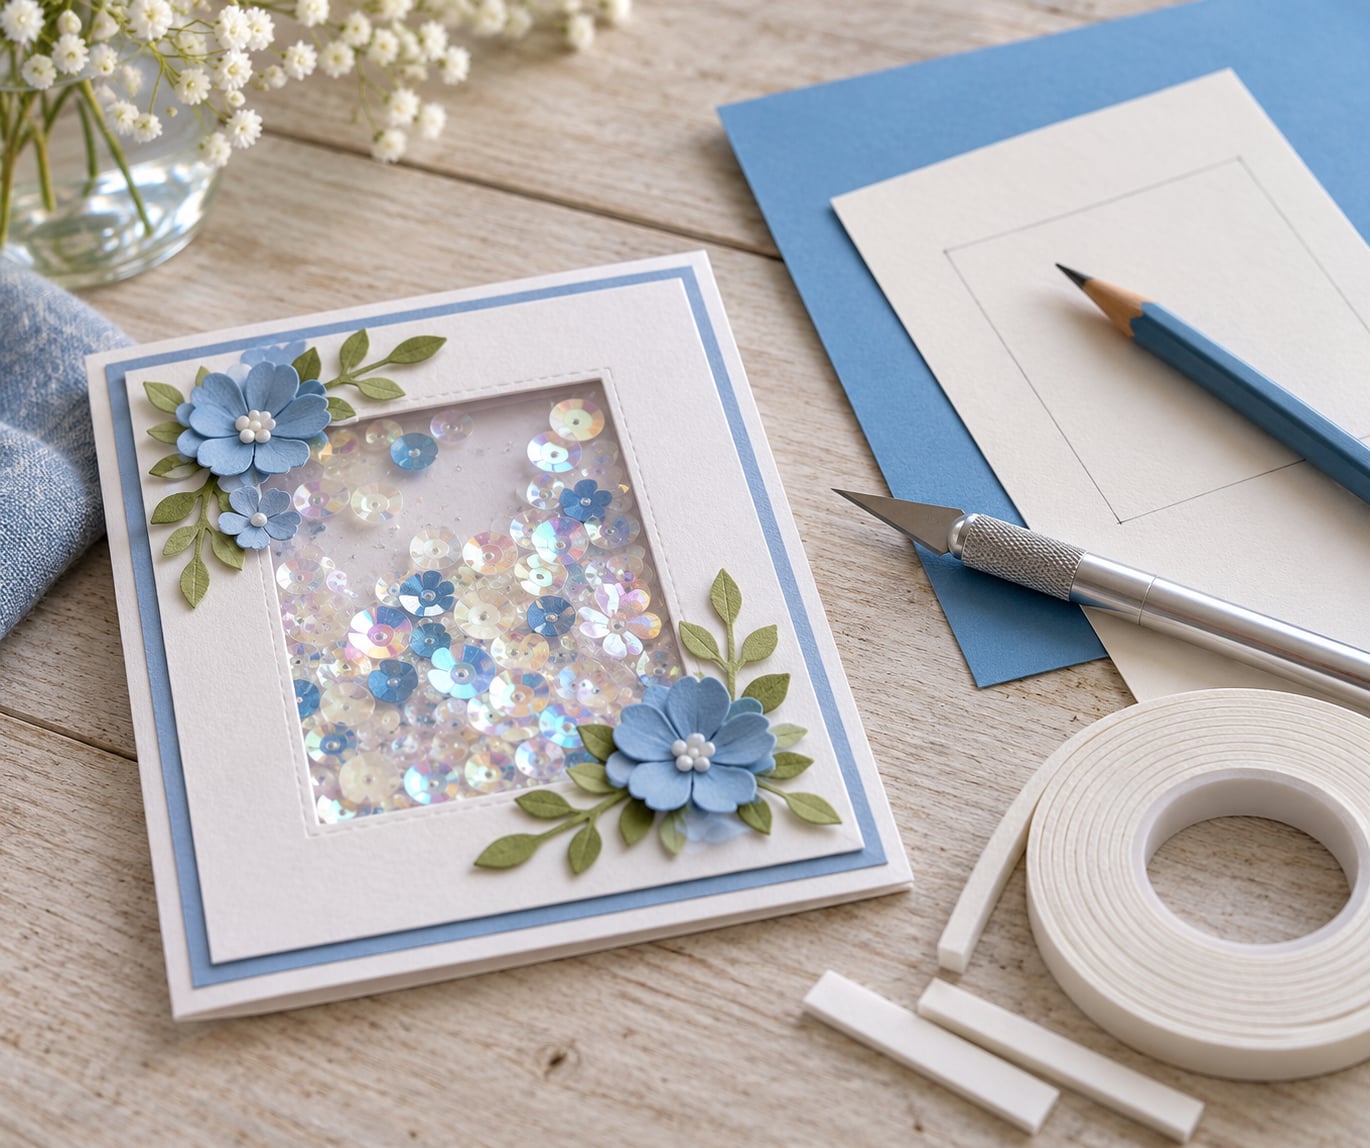
A shaker card is just a card front with a raised pocket of loose bits under a clear window, so nothing about it needs a machine. Cut your own window frame by hand, tape a ring of foam adhesive to it, and lay clear acetate over the top. That is the whole trick, and it takes about half an hour once you have the pieces in front of you.
The finished card works exactly like a die-cut one. Tip it toward a window and the sequins slide across the well, catching the light, and they settle back with a soft rattle when you set it down. Kids get the same sensory payoff, which is the part that actually matters.
Everything below uses scissors, tape, cardstock and one clear sheet. If you have no cutting machine, no dies and no craft punches, you can still finish this on a kitchen table.
Table of Contents
- 1What You Need
- 2How to Make a Shaker Card Without a Die Cutter
- 3Step-by-Step: Build the Shaker Card
- 4Step 1: Choose and Fold the Card Base
- 5Step 2: Mark and Cut the Window Without a Die Cutter
- 6Step 3: Make the Shaker Fill
- 7Step 4: Build the Front Window Layer
- 8Step 5: Add the Shaker Pieces and Seal the Card
- 9Step 6: Decorate and Finish the Card
- 10Common Mistakes and Easy Fixes
- 11Tips for Different Papers and Shapes
- 12Frequently Asked Questions
- 13What paper is best for a shaker card without a die cutter?
- 14Can I make the window with scissors instead of a craft knife?
- 15What can I put inside a homemade shaker card?
- 16How do I stop the filling from falling out?
- 17Can toddlers make this shaker card?
- 18How long does a paper shaker card take to make?
What You Need
Nothing here is specialised, which is the point. Most of it is stuff already sitting in a craft drawer or a junk drawer.
- Card base — a folded 5 x 7 in (12.7 x 17.8 cm) greeting card, or a sheet of 65 to 80 lb cardstock cut and folded by hand.
- Front panel cardstock — one piece about 4.5 x 6.5 in (11.4 x 16.5 cm) in the colour you want the frame to be.
- Clear window sheet — acetate or transparency film, cut roughly 6 x 8 in (15 x 20 cm) so it overhangs the panel on every side.
- Foam adhesive strips — 1/8 to 1/4 in (3 to 6 mm) thick, in the colour of the panel or in plain white.
- Ruler, pencil and craft knife — plus a self-healing cutting mat if you have one.
- Scissors and a corner rounder — the corner rounder is optional but takes the sharpest edge off a cut window.
- Adhesive — a tape runner or double-sided tape for mounting, and glue or tape for sealing the clear sheet.
- Shaker filler — sequins, confetti, small punched shapes, beads. A spoonful is plenty.
If you would rather not cut acetate at all, a clear cello bag or a piece cut from a clear plastic folder works in its place. Clean cellophane from stamp-set packaging is a well-loved free substitute, and so is the clear cover from an old self-healing cutting mat once the mat is worn out.
One safety note for children: the craft knife does this job far better than scissors, so keep it for an adult. There is a scissors-only version further down that a six-year-old can finish.
How to Make a Shaker Card Without a Die Cutter
Before the steps, it helps to know what you are building. A shaker card is three layers stacked in this order.
- The decorated card front, which is the panel with the hole in it. You cut the hole yourself, by tracing a shape and cutting around it, so this is where the die gets replaced.
- The foam dam, a ring of foam adhesive strips stuck to the back of that panel. The ring is the wall of a shallow tray.
- The clear sheet, laid over the tray and stuck down on all four sides, with the loose filler trapped in between.
That tray is the whole mechanism. Shake the card and the filler slides across the base; tilt it and the filler pools at one end. Get the four corners sealed and nothing escapes, which is the single mistake that ruins most first attempts.
Step-by-Step: Build the Shaker Card
Step 1: Choose and Fold the Card Base
Pick a card base that feels solid rather than decorative. Open it flat, run your thumbnail along the fold, and press it against the table to sharpen the crease. A flat, crisp fold matters more than you would think, because a buckled base makes the shaker front sit crooked later on.
If you are cutting your own from cardstock, use 65 to 80 lb weight. Heavier than that is unnecessary, and it does not stop anything from breaking.
You will know it worked when the card lies flat on the table with no lift at the spine.
Step 2: Mark and Cut the Window Without a Die Cutter
Draw your window shape on the front panel first, in pencil, roughly 1/2 in (1.3 cm) in from each edge. A simple rectangle is the most forgiving, and a 3 x 5 in (7.6 x 12.7 cm) opening leaves enough border to hide the tape underneath.
Now cut it out. Set the panel on a cutting mat, hold the craft knife like a pencil, and score along the pencil line in several passes rather than trying to slice through in one. Stop at each corner and finish with a small snip of the scissors, because a knife dragged around a sharp corner bends the cardstock and tears the top fibre.
For a rounded window, trace a plate or a jar lid, cut along the curve in short strokes, and round the corners afterwards. Cutting this window is the only step where learning how to make a shaker card without a die cutter is harder than the machine version, and it still takes about five minutes.
You will know it worked when the hole is centred and the edges are clean, with no fuzzy paper fibres showing through the acetate later.
Step 3: Make the Shaker Fill
Pick small pieces that tumble: sequins, punched paper shapes, tiny wooden beads, glittery foam dots or confetti. The rule is that they need to move freely inside the well, so anything bigger than the narrowest dimension of the window will jam against the sides and stop the shake.
Skip fine glitter. It clings to the clear sheet instead of moving, which is the most common disappointment for beginners. Large flakes and chunky sequins behave exactly how you hope.
Test by tipping a few into your palm. If they slide rather than clump, they are the right size.
Step 4: Build the Front Window Layer
Turn the front panel face down and lay your foam strips on the back, following the cut-out shape. Butt the ends of each strip tightly together at the corners rather than letting them overlap, since an overlap is where a leak starts. Four straight runs usually beat anything curved.
Press every strip down firmly with your thumb. Foam that has not bonded properly lifts in a week and lets the filler escape, and you cannot see the problem until it has happened.
You will know it worked when the ring is continuous with no visible daylight at any corner, and the panel rests level on the table.
Step 5: Add the Shaker Pieces and Seal the Card
Lay the panel face up, add a small spoonful of filler inside the cut-out, and cover it with the acetate or clear sheet. Let the sheet float down from the centre outwards rather than dropping one end first, which pushes air into a corner and leaves a bubble.
Run a thin line of glue or double-sided tape around the outside edge of the foam ring and press the clear sheet down onto it. Keep the glue on the foam line only, not across the middle. The pocket needs to stay open for the filler to slide.
Press the edges with your thumb, working around the frame a few times. Do not press the middle, and let it sit flat under a stack of books while the adhesive grabs.
You will know it worked when you shake it over an open palm and absolutely nothing comes out.
Step 6: Decorate and Finish the Card
Mount the finished panel on the card base with a tape runner or double-sided tape, then decorate around the window: stickers, stamped images, a hand-drawn border, or cut-out shapes in coordinating colours. Keep thick embellishments off the shaker area itself, since anything raised blocks the view.
Write your message on the inside panel. Give the card at least half an hour flat under something heavy before you pick it up, because the foam and adhesive need the time to fully set.
Common Mistakes and Easy Fixes
Almost every failed shaker card comes down to one of six things.
- Filler leaks from the corners. The foam strips overlapped instead of butting. Peel the strips off, lay new ones down end to end, and press harder at each joint.
- Glue spread across the pocket. Wipe the excess with a damp finger before it dries, then clear a path between the fill and the acetate with tweezers.
- The acetate is wrinkled or cloudy. Haste. Clear sheets stretch and scuff easily, so they need scoring and patience more than force.
- The cut window is crooked. The paper flexed while cutting. Trace with a sharp pencil, cut on a mat, and round the corners to hide the wobble.
- Nothing moves inside. The filler is too large for the window, or the foam is too thick, so there is no room to slide. Use smaller pieces or thinner strips.
- The card will not close. The shaker panel is thicker than the base allows. Trim the foam, or mount the panel with its top edge slightly below the card’s fold line.
A separate trick worth knowing: sealing the whole window into a sealed cello bag instead of building a foam dam removes the leak risk altogether. It gives you a shallower shaker, but it is the version most families repeat because it is fast and forgiving.
Tips for Different Papers and Shapes
Construction paper works for a quick card, but it is too thin to hold a raised well, so put the foam dam on a stiffer cardstock panel and mount that panel on the coloured paper. Treat cardstock as the default for anything you want to feel solid, and pick patterned paper for the border so the eye lands on the window rather than on the pattern.
For shapes, rectangles are easiest, circles suit snowmen and pumpkins, and a stitched or heart shape gives you the same result as long as you cut in short strokes around the curve. Anything you can trace, you can cut, and you can always turn that traced shape into a reusable template on thick paper for the whole family.
Frequently Asked Questions
What paper is best for a shaker card without a die cutter?
Cardstock between 65 and 80 lb is the best all-round choice. It holds a raised foam dam without bowing, and it takes a traced window line cleanly. Construction paper is fine as the coloured layer but too flimble for the shaker well on its own. Laminated paper and chipboard both work, though they add bulk that makes the card harder to mail.
Can I make the window with scissors instead of a craft knife?
Yes. Trace the shape with a sharp pencil, cut partway along the line with scissors, then finish the last layer by scoring through with a craft knife or the blunt back of the scissors. A cutting mat protects your table, and rounding the corners afterwards hides any jaggedness. This is the version most suitable for older children.
What can I put inside a homemade shaker card?
Sequins, chunky glitter, punched paper shapes, tiny wooden beads, small buttons, confetti and dried flowers all work. Choose pieces that tumble freely and fit through the narrowest part of the window with room to spare. Fine craft glitter sticks to the clear sheet instead of moving, so pick larger flakes or iridescent sequins instead.
How do I stop the filling from falling out?
Butt the foam strips end to end at each corner rather than overlapping them, then press the whole ring down firmly so every strip is bonded. Keep the filler small enough that nothing jams against the foam, and seal the clear sheet right around the outside edge of the ring. Shake it over an open palm before you mount it on the card base.
Can toddlers make this shaker card?
Children around six and up can manage it with a traced template, scissors instead of a knife, and an adult handling the cutting and the glue. Sealing a cello bag rather than building a foam dam is easier for small hands because it needs no cutting at all. Avoid small loose pieces entirely for children under three, since they are a choking risk.
How long does a paper shaker card take to make?
Allow about 30 minutes for a first card, plus drying time. Cutting the window takes five minutes, the foam dam five, sealing and filling five, and decorating takes whatever time you want to give it. Once you have cut one template, later cards go much faster because you can trace instead of measure.
Start with the card base and the traced window, because everything else depends on that panel fitting well. Once the cut is clean, the foam ring and the clear sheet take about ten minutes, and you have a card that moves. Keep your first template, because the second one will take half as long.