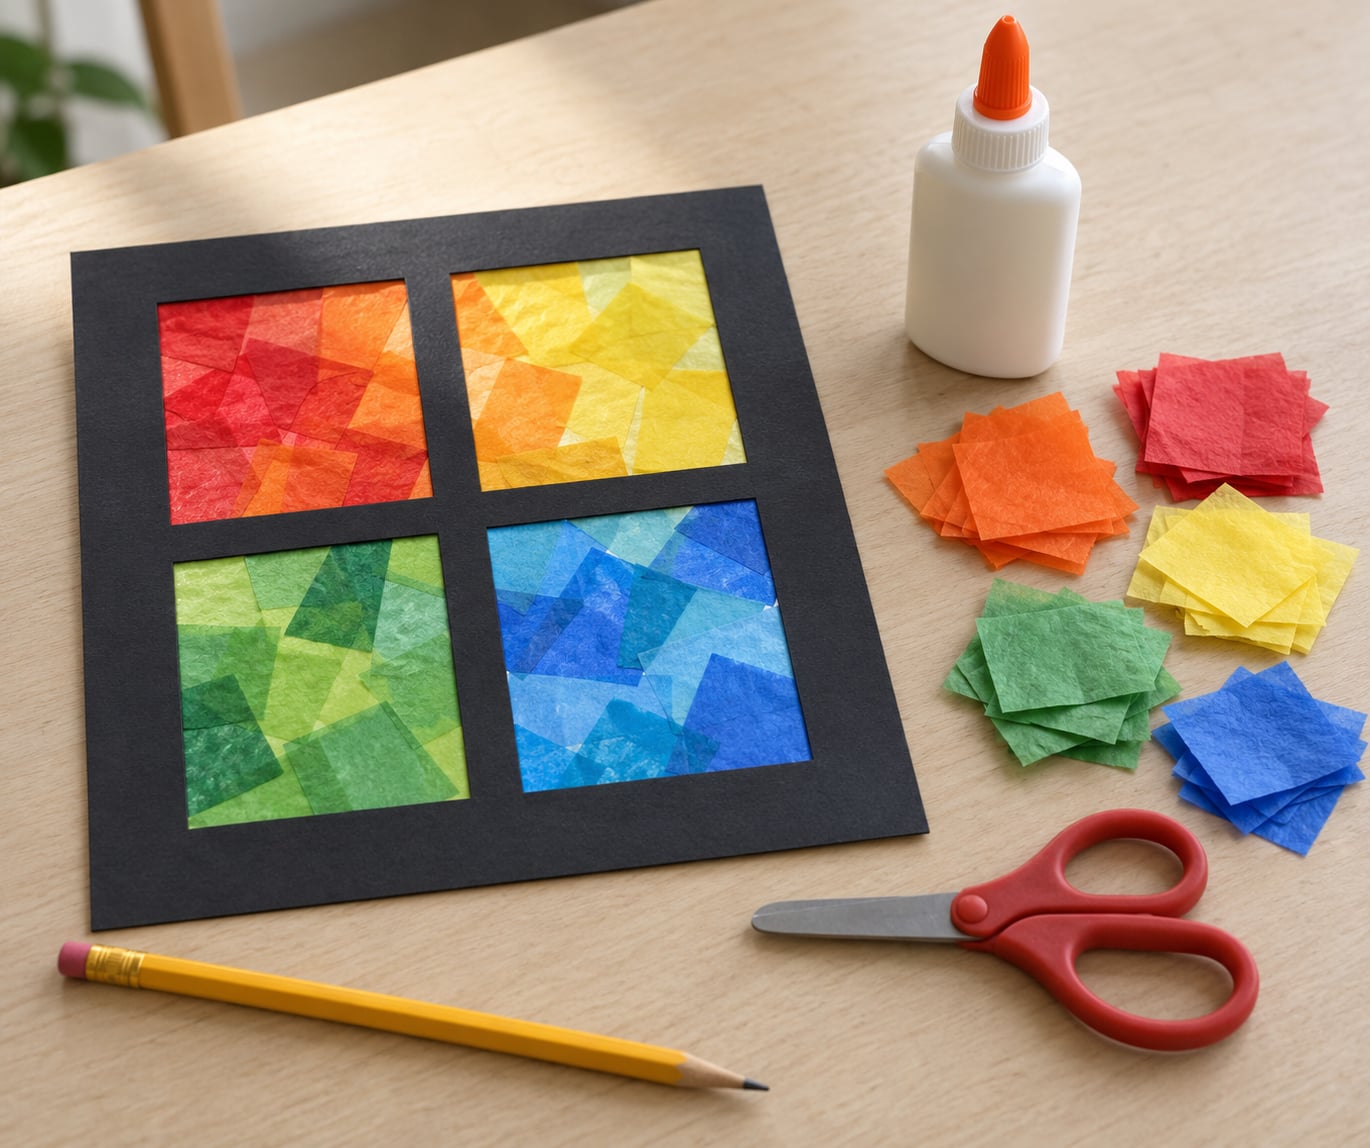
How to make a stained glass window craft with kids is simpler than it sounds, because the version that works best in a home or classroom never uses real glass. You cut a window frame out of black cardstock, glue translucent tissue paper behind the openings, and hang the result where sunlight can pass through it. Most children finish one in 30 to 45 minutes, and the whole project needs about six everyday supplies.
That matters because the most popular stained glass craft tutorials online lean on picture-frame glass and hot glue guns, which are not great crafts for anyone under eight. Skip both and you get the same glowing colors with none of the sharp edges or heat risk.
Below is the method I use, broken into seven steps, followed by the fixes for the problems that actually come up: torn tissue, glue showing through the front, colors that look muddy, and hanging tabs that rip off the wall.
Table of Contents
- 1What You Need
- 2Step-by-Step: How to Make a Stained Glass Window Craft with Kids
- 31. Choose a Simple Window Design
- 42. Trace the Design onto Cardstock
- 53. Cut Out the Frame and Shapes
- 64. Add the Tissue Paper Colors
- 75. Glue the Tissue Paper to the Back
- 86. Add Decorative Details
- 97. Display the Finished Window
- 10A note on what makes this a good craft
- 11Common Mistakes
- 12Frequently Asked Questions
- 13What is the best age for making a stained glass window craft?
- 14Can children use real glass to make this stained glass window craft?
- 15How long does the craft take to make and dry?
- 16What materials can replace tissue paper for a stained-glass effect?
- 17How can I make the stained glass window craft easier for preschoolers?
- 18Can this stained glass window craft be used in a classroom?
- 19Conclusion
What You Need
Everything here comes from a craft drawer, a dollar store, or the glue you already have in the cupboard. Nothing needs to be bought specially.
- Black cardstock — one sheet, roughly 9 by 12 inches. Black is what makes the leading lines read as stained glass. Dark green or dark blue works too, but true black is easiest to trace on and hides glue shadows best.
- White cardstock or printer paper — one sheet, for your design template.
- Tissue paper in 4 to 6 colors — about 8 to 10 squares per color. Regular gift tissue is fine. The thicker, stiffer kind marketed as glassine is harder for small hands to handle.
- School glue or washable white glue — a bottle with a narrow tip. Craft glue dries clearer and holds better, but plain school glue works if that is what you have.
- Blunt-tip scissors — rounded tips for anyone under eight.
- Pencil, eraser and a fine-tip black marker — for tracing and for thickening any faint leading lines.
Optional extras: a bottle of clear nail polish or acrylic gloss to seal the finished piece, a scrap of plastic or acetate to reinforce the back, painter’s tape with a spare sheet of plain paper for mounting, and markers or glitter glue for the decorating stage.
As a child-safe stand-in for broken glass, treat the cardstock frame as the glass panes. It holds the same shapes, gives the same black outline, and if a piece does snap or tear you have lost nothing that cost money. For younger children, you can also skip cutting entirely and use a pre-cut frame you have made yourself.
Quantities for one window: one cardstock frame, 30 to 50 tissue squares, and about a quarter bottle of glue. A pack of tissue paper has enough for six or seven windows, so the leftovers are not wasted.
Before you start, cut the tissue into squares. Squares that are roughly the same size are much easier for a child to place accurately than long thin strips, and the trimming happens now rather than mid-project.
Step-by-Step: How to Make a Stained Glass Window Craft with Kids
1. Choose a Simple Window Design
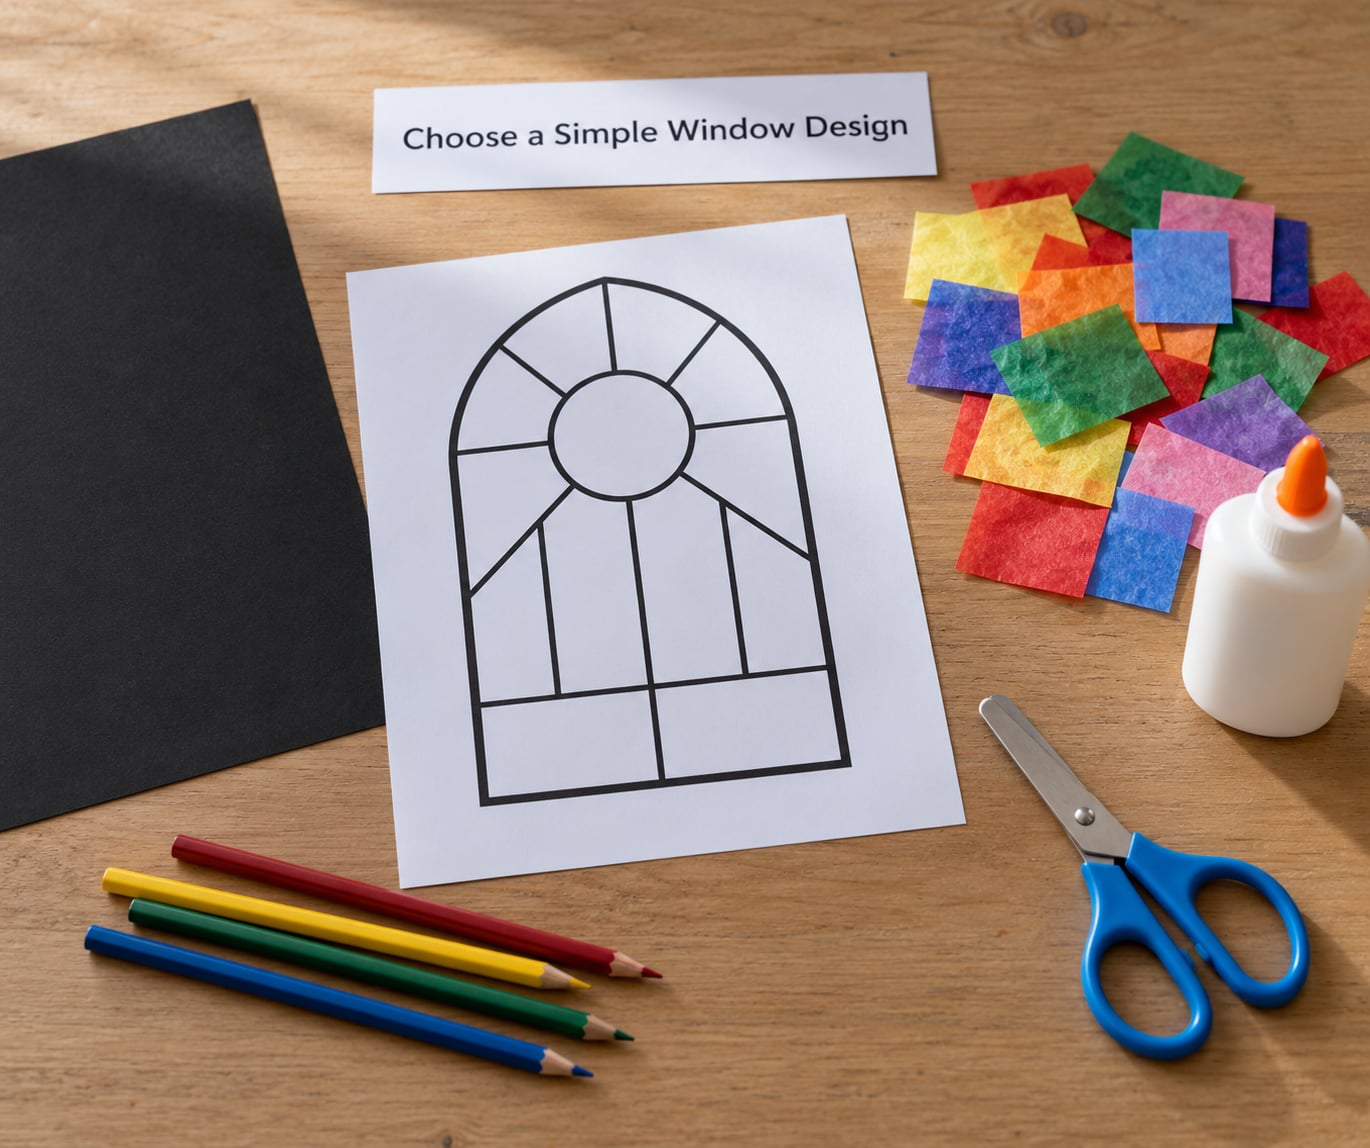
Start with a design that has a few large shapes, not a busy picture. A four-pane cross, an arch with three openings, a rainbow of six curved bands, or a simple flower all work well. Large openings mean a child can place one piece of tissue, see the mistake, and fix it before the glue sets.
Match the design to the age. Preschoolers do best with a four-pane grid, because every shape is the same size. Elementary-age children can handle an arch, a flower, or a six-section rainbow. Older kids can attempt a mandala with radial symmetry, where each wedge mirrors the one beside it.
Test the layout on scrap paper first. Have your child draw the shapes roughly in pencil on a sheet of scrap paper and place loose tissue squares inside them. If the pieces overhang wildly, the design is too detailed; simplify before you cut anything.
2. Trace the Design onto Cardstock
Cut one sheet of black cardstock slightly larger than your template, then tape the white template down on top of it. Trace the outer window outline first with a pencil, pressing firmly enough that the line is visible but does not tear the paper.
Next, trace each interior shape. Real stained glass has thick leading between every pane, so the lines need a bit of weight. I trace once with a pencil and go over every line a second time with a fine-tip marker, which gives the frames a heavier, more glass-like edge.
Check the tracing before cutting. Missing line segments are the single most common reason a finished window falls apart at the cutting stage, so hold the cardstock up to a window and look for any gaps in the outlines.
3. Cut Out the Frame and Shapes
Cut along the outer outline first, then cut out each interior shape from the center outward. Poking a small hole with the scissor tip in the middle of a shape and cutting outward to the line gives children a much easier start than stabbing the blade straight in from the edge.
For safety, have an adult make the initial hole. It removes the most common cause of small accidental cuts with blunt scissors.
Keep the cut-out pieces organized. Sort them into piles by color as they come off the cardstock, and keep the black frame separate. If a child cuts through the outer edge by mistake, that frame piece is not finished; a spare sheet of black cardstock solves it in seconds.
Your test is a frame with clean, open windows and visible black lines between them. If the lines are thinner than a pencil stroke anywhere, go over it with the marker now rather than trying to hide it later.
4. Add the Tissue Paper Colors
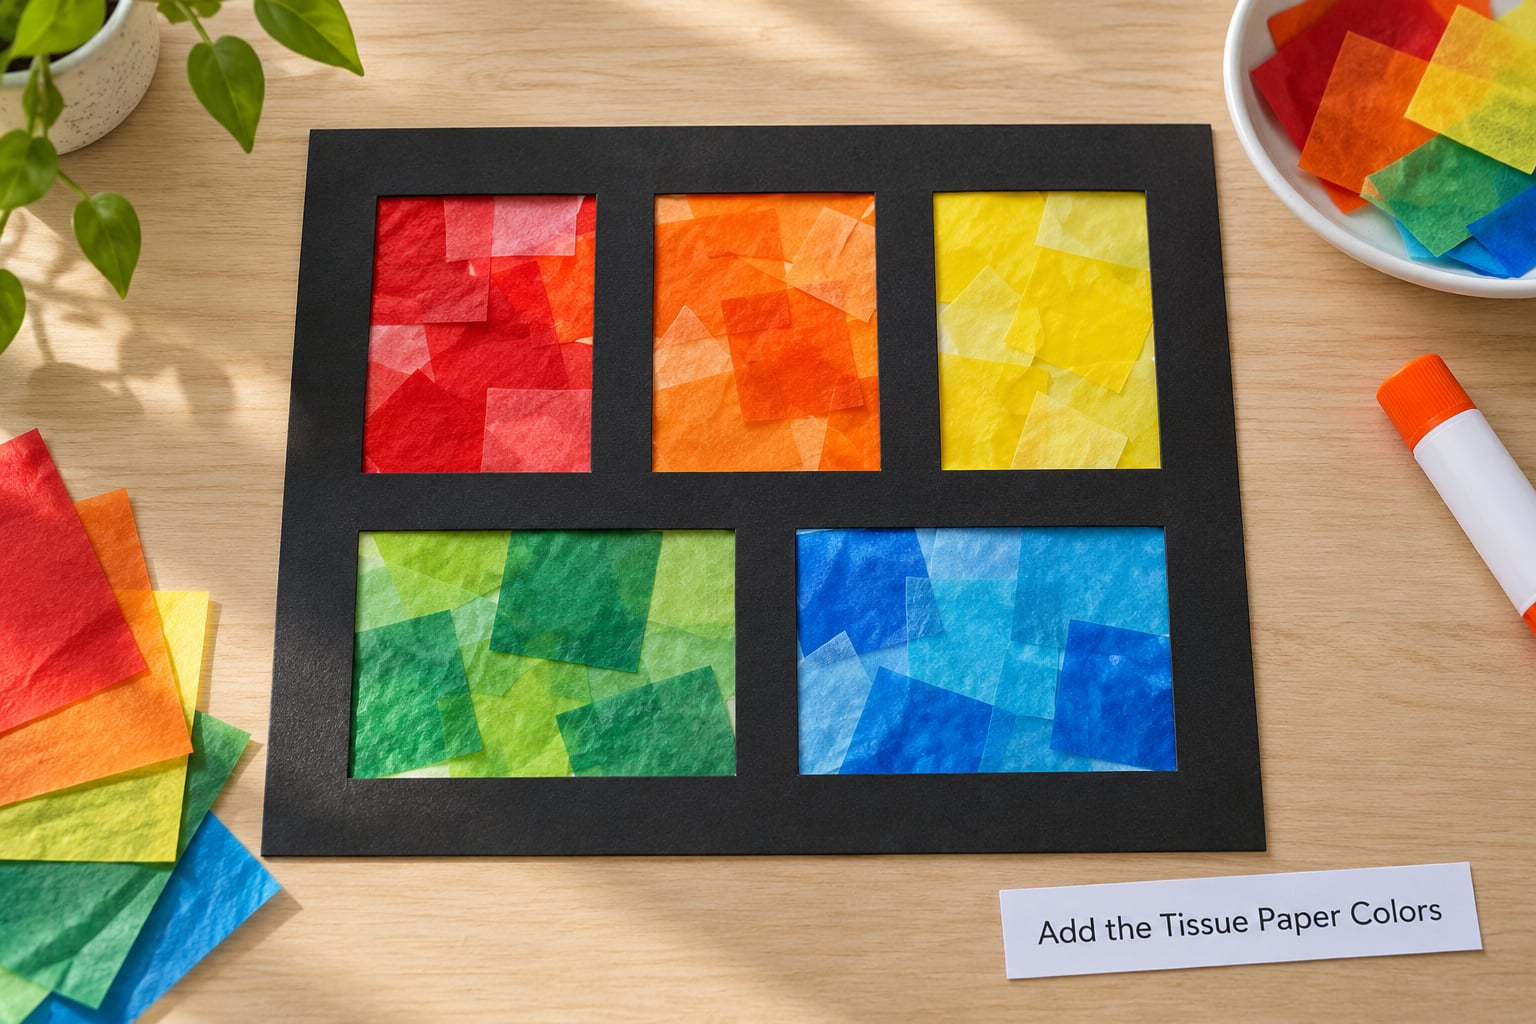
Pick a color scheme before the first piece goes down. Three to five colors is plenty. A warm scheme uses red, orange, yellow and gold; a cool scheme uses blue, green, purple and teal. Mixing warm and cool colors without a plan is how a window ends up looking muddy.
Lay the dry tissue pieces into the openings first, with no glue at all. This dry run is the most important step for getting a good result, because it lets a child rearrange, swap and trim while nothing is stuck down.
Layer one or two pieces per opening. Two overlapping sheets of the same color look noticeably deeper, and a blue square over a yellow one gives green, which is a small and reliable color lesson. Overlap a little rather than matching edges exactly; you want the layered texture to be visible.
Trim each piece with scissors so it sits a few millimeters under the black line, not on top of it. A small overlap under the frame edge is good, since it closes the gap that light leaks through.
5. Glue the Tissue Paper to the Back
Turn the frame over and work on the back, where the tissue sits between the paper and the wall. Squeeze a thin line of glue around the inside of one opening, not across the whole frame at once.
Set the tissue piece in place, adjust it with your fingers, then wipe the excess off with a damp cloth or a tissue. A damp cloth is better because it lifts dried glue from fingers and from the back surface without leaving a shiny patch.
Work one opening at a time and let each one set before moving on. A thin layer is what you want. Thick blobs squeeze out from under the tissue when you press, and that is the most common reason glue shadows show through the front.
Do not press the tissue flat with your palm. Pat it down gently, or the paper wrinkles and the layered look disappears.
6. Add Decorative Details
Once the tissue is dry to the touch, add the finishing touches. White or gold markers work well for small highlights inside a pane. Glitter glue adds sparkle without much mess, and paper gems or punched paper circles make good centers for a flower design.
You can also paint leading. Mix a little black acrylic paint with white glue until it runs slowly off a brush, then trace the interior lines on the front. Let it dry fully, several hours or overnight, before the piece goes near a window.
Skip anything sharp or breakable. No real glass, no ceramic pieces, no bead sticks pushed into cardstock. If a child wants something sparkly, foil squares or holographic gift wrap give the shine without a single edge that can cut.
An adult should handle any decoration that needs a craft knife, a hot glue gun, or a hard surface to break pieces on.
7. Display the Finished Window
Let the piece dry flat for a few hours, or overnight if you used a thick layer of glue or any acrylic paint. A piece that feels cool and slightly tack-free is ready.
If you want it to last, glue a second sheet of black cardstock to the back. That doubles the strength, hides the glue, and keeps the tissue from curling away from the frame over time.
For hanging, attach a length of clear tape or a paper tab to the top edge before the second backing goes on. Reinforcing tape is more reliable than a paper tab, which tears off the wall the first time a child tugs it. A loop of yarn glued around the top edge also survives small hands.
Find the brightest window you have. Direct sun makes the colors glow, but direct sun also fades tissue paper over time, so a window that gets a few hours of softer light will keep its color longer. Homes without a sunny window can use a light table or hold the piece up against a lamp with a white shade.
A note on what makes this a good craft
There is no wrong result here, and that is the point. Kids choose colors, decide how pieces overlap, and change their minds mid-project, and the value is in that trial and adjustment rather than in a result that matches a picture.
Hand control improves with every cut and every piece of tissue placed and re-placed. For children who struggle with pencil control, this gives the same muscle work without the frustration of staying inside lines.
Common Mistakes
Torn tissue paper. Tissue tears when it is pulled rather than laid down, and when a child tries to stretch a piece to fit. Fix it by cutting a larger piece and trimming the excess after it is glued, and by making sure the cardstock frame is flat on the table rather than held in the air.
Dull or jagged cuts. Scissors that are too small for the shape cause most of this. Have an adult cut the large window openings, and let children cut small interior shapes. A paper plate with a folded edge makes a decent cutting surface and gives better control than thin paper.
Glue showing through the front. You used too much, or pressed too hard. Lift the tissue back, wipe the cardstock clean, and re-lay the piece with a thin line of glue. Prevention is easier: a bottle with a narrow tip lets a child control the amount far better than a wide squeeze bottle.
Uneven or muddy color. Too many colors, or random overlaps. Limit the palette to three to five colors and place the darkest in the smallest panes. Cutting a new square instead of reusing a piece that has already been handled also keeps the colors cleaner, since skin oils and glue residue dull tissue fast.
Wrinkled tissue. The paper was not flattened before gluing. Press each piece flat with your palm on the scrap table first, then place it. For a piece that wrinkles as it goes down, glue only the center and the corners, letting the middle relax.
Hanging tabs that tear off. Paper tabs are the weak link. Use tape, yarn, or an extra strip of cardstock glued across the top edge and folded over, and let the glue dry fully before the piece goes on the wall.
Colors that fade. Direct sun breaks down tissue over a few months. Move the piece to an indirect window, or rotate it occasionally. If a window gets strong light all day, a clear sheet of acetate or contact paper on the front slows the fading and also makes the surface wipeable.
To scale the project, keep the same method and change the size. Larger panes suit older children, while more, smaller panes suit younger ones who need quicker wins. For a different texture, use torn tissue edges instead of scissored ones; the result looks irregular and painterly, and it removes the cutting step entirely for children who find scissors hard.
Frequently Asked Questions
What is the best age for making a stained glass window craft?
Preschoolers from about age 3 do well with the tissue paper method, using a four-pane grid with large openings and blunt scissors. Children 5 to 7 can manage more shapes, layering two pieces of tissue per opening, and adding marker details. From age 8, kids can handle a detailed design, paint their own leading lines, and cut their own interior shapes. Adults should always handle any step involving a craft knife or hot glue.
Can children use real glass to make this stained glass window craft?
I would not recommend it for children under eight. Real glass breaks into sharp fragments, and cleaning up a breakage mid-craft tends to end the activity. The black cardstock frame gives the same leading-line look and behaves the same way when light passes through the tissue paper. If you already own a framed glass panel and want a stained glass effect, an adult can do the cutting and the child can do the coloring, but cardstock is a safer first version.
How long does the craft take to make and dry?
Making one window takes 30 to 45 minutes for most children, with cutting taking the largest share of that. Drying is quick: the tissue paper is dry to the touch in a couple of hours and fully set by the next day. If you add acrylic paint for leading lines, allow several hours or overnight. A second backing sheet of cardstock makes the piece stronger but adds a full drying period before it can be hung.
What materials can replace tissue paper for a stained-glass effect?
Colored cellophane or gift wrap gives a brighter, glossier result than tissue paper and is easy for small hands to handle. Tracing paper or vellum can be colored with markers for a subtler look. Translucent fabric squares and colored parchment paper also work. A light table under the piece makes every one of these materials easier to see while you work, which matters most in a room without a sunny window.
How can I make the stained glass window craft easier for preschoolers?
Use a frame you cut yourself, with four large square openings, and let your child place and glue the tissue rather than cut it. Pre-cut the tissue into squares ahead of time so the only tool in the room is a glue stick or school glue. Four panes mean four decisions, which is about as much as a three-year-old can plan in one sitting. Expect the result to look uneven, and tell them that uneven is the point.
Can this stained glass window craft be used in a classroom?
Yes, and it works well as a table-top art station because it needs no heat, no sharp tools beyond blunt scissors, and very little space per child. Set out a shared box of tissue squares, several pre-cut black cardstock frames, and glue in small bottles, then let children rotate through the station. Finished pieces dry flat on a tray, so you can stack them. Mount each one on a single sheet of paper for a classroom display wall rather than hanging them individually.
Conclusion
Begin with a single large window outline, no more than four or six panes, and cut three to five tissue colors into squares before anyone sits down. Let your child arrange the pieces on the frame in a dry run, then glue them one opening at a time. That dry run is what separates a window that glows from one that looks patchy.
Once it is on the wall, the next version is obvious: more panes, a different palette, a seasonal theme. This guide was checked for 2026, and every material on the list is something you already own or can pick up in one shop.