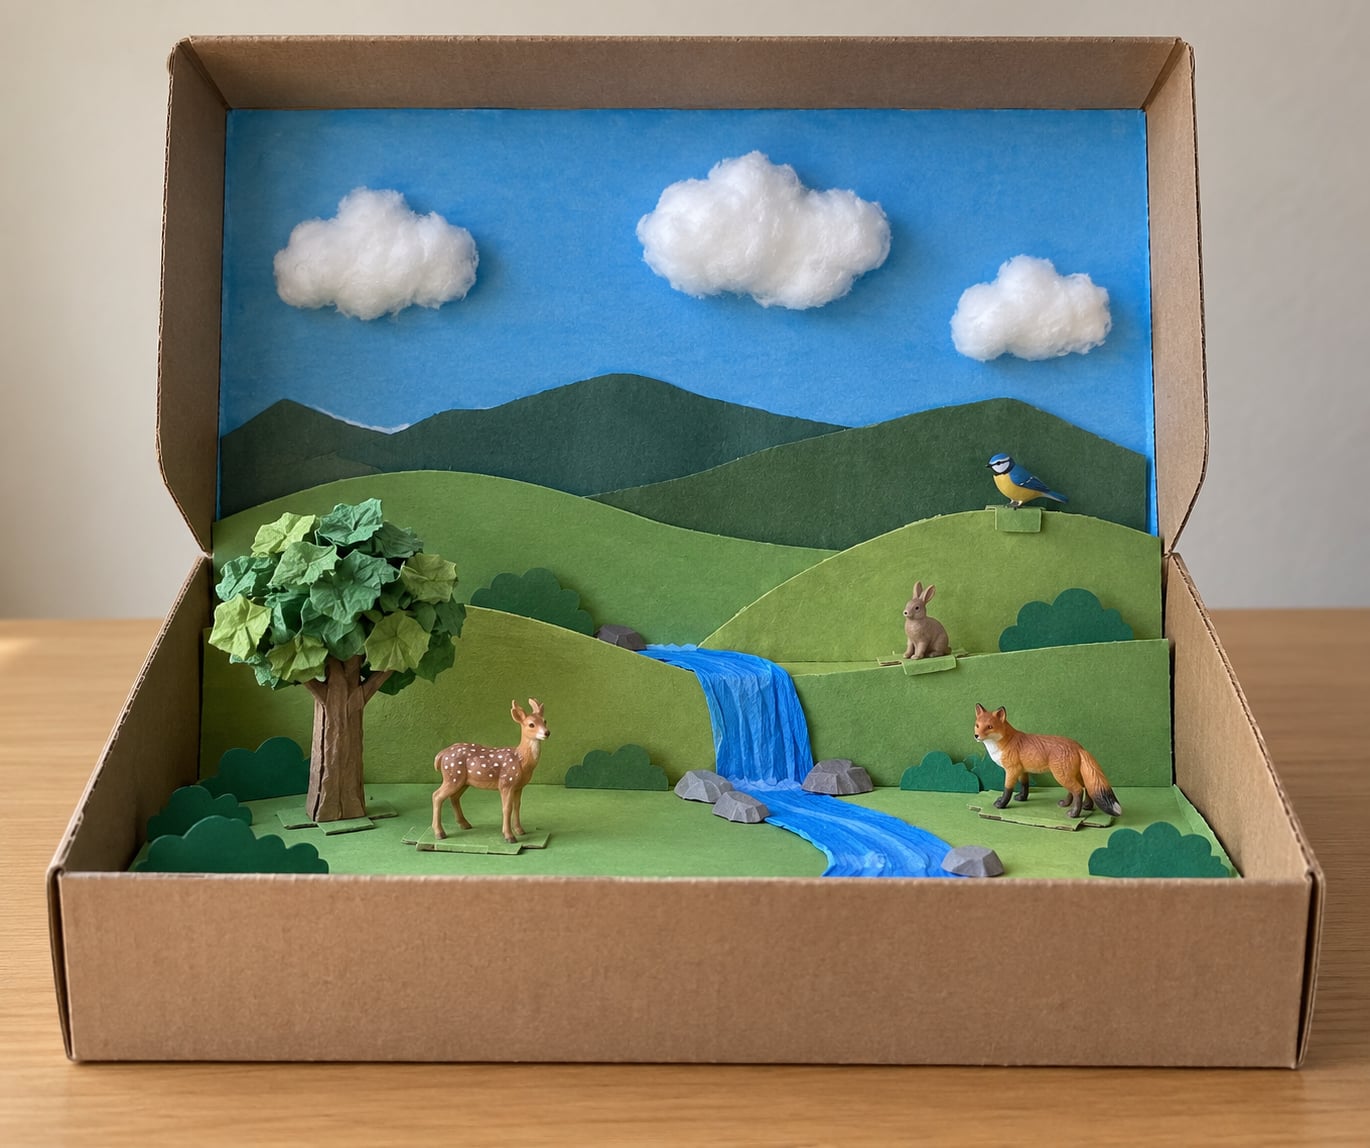
A shoebox diorama is a miniature scene built inside a cardboard box, and the whole thing usually takes one afternoon plus a night for glue to dry. Paint or paper the interior, build your scenery in three depth layers, stand your figures up on small cardboard tabs, and you have a finished display piece for a school project, a book report or the mantelpiece.
Most people who try this for the first time run into the same two problems: figures that fall over and scenery that looks flat. Both come down to planning and layering, which is where this guide picks up.
Table of Contents
- 1What You Need
- 2Step-by-Step: How to Make a Shoebox Diorama
- 31. Plan the Scene
- 42. Prepare the Shoebox
- 53. Make the Background
- 64. Build the Layers: How to Make a Shoebox Diorama Look Deep
- 75. Add the Main Details
- 86. Finish the Diorama
- 9Common Mistakes
- 10Frequently Asked Questions
- 11What materials are needed for a shoebox diorama?
- 12How can I make a diorama box at home?
- 13How do I make dioramas for beginners with no craft experience?
- 14How do I create a habitat diorama in a shoebox?
- 15How do I make figures stand up in a shoebox diorama?
- 16How long does a shoebox diorama take to dry and finish?
- 17Conclusion
What You Need
Gather everything before you cut anything. It is far easier to run to the kitchen for scissors than to stop halfway through a build.
- A box. A shoebox works, but a tissue box, a cereal box or even a sturdy cardboard tray gives you a shallower stage, which some themes suit better.
- Paint or construction paper for the walls and floor of the box.
- Cardboard scraps cut into hills, buildings, tree trunks and platforms.
- Cotton balls, tissue paper, yarn, beads or dry pasta for texture: clouds, water, foliage, rocks.
- Small figures. Toy people and animals, plastic animals from the dollar aisle, or cardboard cutouts you draw yourself.
- Glue. White school glue for paper and craft foam, hot glue for anything heavier.
- Scissors, craft knife, ruler, pencil and markers.
- Optional extras: baking soda for a snow dusting, foil for water, a mini LED tea light for a glow effect, clear tape, and acrylic paint for detail work.
Cheap swaps work fine. Foil stands in for foil-faced scenery, foam sheets replace thin cardboard, and old magazines cut into strips make convincing bark and stone texture.
Step-by-Step: How to Make a Shoebox Diorama
Six stages, in this order, get you from an empty box to a finished scene. Do them in order even if it feels slow at the start, because each stage assumes the one before it has dried.
1. Plan the Scene
Pick one theme and keep it narrow. A rainforest with four layers of vegetation reads better than a rainforest, a village, and a volcano in the same box.
Next, decide what sits in the foreground, the middle ground and the background. Foreground pieces touch the front edge and can be tall. Middle-ground pieces carry the action. Background pieces are flat and sit against the back wall. Sketch this on scrap paper with a pencil and roughly to scale before you cut a single thing.
Scale is the part beginners skip. Decide on one size for your smallest detail and hold everything to it. If your main character is 5 cm tall, a tree should be about 15 cm, not a full shoebox height.
2. Prepare the Shoebox
Clean the box and let it dry fully. Dust and grease are the reason paint peels off cardboard later.
Cut off the lid so you get an open-front stage, or leave the lid on as a backdrop if your theme is a single wide scene. If the base flexes when you press it, glue a second layer of cardboard underneath for a floor that will hold weight.
Tape any gaps in the corners. Once the paint is on, you cannot get at the seams easily.
3. Make the Background
Paint or paper the back and side walls first, before you add anything that blocks them. A single flat colour usually works, but a gradient from a lighter horizon to a deeper top reads as distance.
Give yourself more depth with the curved background technique. Do not lay a flat sheet against the back wall. Curve it instead, so it sweeps from the base of the wall forward to meet the floor. Builders on hobby diorama forums describe this single move as the biggest upgrade a beginner can make, because it removes the hard corner line and makes the scene feel like it continues past the box.
Score a light crease down the middle of the sheet, then press it gently into a curve. Tape the front edge down on the floor and the back edge on the wall, then fill the middle with a thin strip of filler material so the curve holds its shape.
4. Build the Layers: How to Make a Shoebox Diorama Look Deep
Depth comes from spacing things apart, not from adding more. Work from the back wall forward.
Glue your tallest, flattest scenery to the back: a painted skyline, a sky gradient, distant hills. Then build a middle plane, maybe 3 to 5 cm in from the back wall, with hills, trees or buildings. Leave the foreground mostly open so the eye has somewhere to land.
Stand scenery on cardboard platforms roughly 1 cm tall so the layers read as separate planes once you look straight on. Keep pathways and sightlines clear. If a big tree in the foreground hides the character, cut the tree down to a stump or move it to the side.
Cardboard, foam sheets, and folded paper all work for this stage. Add texture while the glue is wet: dab sponge on paint for rocky ground, pull yarn apart for grass, crumple tissue paper and glue it down for boulders.
5. Add the Main Details
Figures are the part people rush, so here is the technique that works: cut a small rectangular tab about 1 inch wide at the base of each figure, bend it forward at a right angle, and glue that flat tab to the floor. The figure then stands on its own instead of leaning against the scenery.
For anything hanging, cut the tab at the top of the figure instead, bend it backward, and glue it to the underside of the lid or a crossbar of string stretched across the top of the box. Flying birds, lanterns and jellyfish all hang this way.
Set scale before you set placement. Place each figure, step back a metre, and squint. Anything that looks wrong is usually the wrong size, not in the wrong spot.
Match the glue to the job. White glue dries clear and works for paper, foam and fabric. Hot glue grips heavier pieces such as bottle-cap animals and wooden toys, and it sets in seconds. Avoid flooding either one; a thin film holds, a thick puddle shows and shows forever.
Once your main details are placed, add small touches that tell the story: a fence line, a trail of footprints, a labelled specimen tag, a warm light source tucked behind a building.
6. Finish the Diorama
Give the whole thing 24 hours before you move it. Paint, thin glue and paper need that long to fully set.
Add the last texture and any glitter or small signs, then put a dust clear cover over the top of the box if you have one. Skip anything loose or sharp near the open front, especially with younger children in the house.
For transport to school, slide the box into a second, larger cardboard box with crumpled paper packed around all four sides. That protects the foreground pieces, which is where the breakage always happens.
Common Mistakes
Nearly every first diorama has the same handful of problems. Each of these has a straightforward fix.
Figures fall over. They need a base tab, not a blob of glue. Cut the 1 inch tab, crease it firmly, and glue it flat to the floor.
The scene looks flat. You are probably using one depth plane. Add at least three, spaced at different distances from the back wall.
Everything is the wrong size. You probably used real-world objects at full scale. Make one reference size, such as a 2 cm figure, and scale everything from it.
Paint smudges and peels. Two causes. You either painted a dirty box or you applied paint too thickly. Wipe the box down first and use thin coats.
Glue is visible. Excess glue squeezes out from under heavy pieces. Apply a thin film, hold the piece in place for 30 seconds, then wipe the squeeze-out with a damp cloth before it cures.
Background paper wrinkles. It got stretched or glued unevenly. Crease the curve first, lay it loose, then anchor the edges with tape instead of glue.
You ran out of space. Too many elements. Remove half of the smallest details. A diorama with five clear pieces looks better than one with twenty crowded ones.
It took twice as long as expected. Almost always drying time. Paint and paint over cardboard late in the day and the project stretches to two days, so start early morning.
A few habits help more than any other tip: paint the interior first, plan placement before you glue anything, and use a bottle of craft glue with a fine nozzle. Most beginner disasters come from rushing one of those three.
Frequently Asked Questions
What materials are needed for a shoebox diorama?
You need a cardboard box, paint or construction paper for the walls, cardboard scraps for scenery, glue, scissors and markers. Add cotton balls, tissue paper or yarn for texture, plus a few small figures from toy boxes or the craft drawer. Everything here comes from a craft cupboard or a recycling bin, so nothing needs a special trip to the store.
How can I make a diorama box at home?
Turn a shoebox, tissue box or cereal box into an open-front stage by cutting the lid off or using it as a back wall, then tape the corners and glue a second cardboard layer underneath if the base bends. Paint or paper the interior before adding anything, and let each coat dry fully before the next stage begins.
How do I make dioramas for beginners with no craft experience?
Keep the theme to one idea, use three depth layers, and hold every piece to a single reference size. White glue for paper, hot glue for anything heavier, and one thin layer each. Most beginners find that careful cutting matters more than painting skill, so take your time with the scissors and let the scene stay simple.
How do I create a habitat diorama in a shoebox?
For an animal habitat, paper or paint the back wall as sky or forest, then build ground cover in three layers using sponge-dabbed paint for rock, pulled yarn for grass, and cotton balls for snow or clouds. Add a water surface from blue paper or foil, place two or three animals at a consistent scale, and label each with a small tent card.
How do I make figures stand up in a shoebox diorama?
Cut a small rectangular tab about 1 inch wide at the base of each figure, crease it at a right angle, and glue the flat tab to the floor. That gives the figure a wide footprint instead of a thin edge. For figures that fly or hang, cut the tab at the top instead and glue it to the underside of the lid.
How long does a shoebox diorama take to dry and finish?
Plan on about two to three hours of active building for a beginner project, plus 24 hours of drying before you move it. Paint needs a full night between coats if you are covering the whole interior. Start in the morning and the diorama can be finished and displayed the next day.
Conclusion
Start with the box: clean it, decide on a single theme, and draw your three layers on scrap paper before anything else. That ten-minute plan is what separates a diorama that looks deep from one that looks like a shoebox with paper in it.
Once it is dry, let your child add the details that matter most to them, whether that is a sign, a small character or something silly. Then display it on a shelf or hand it in as a finished project.