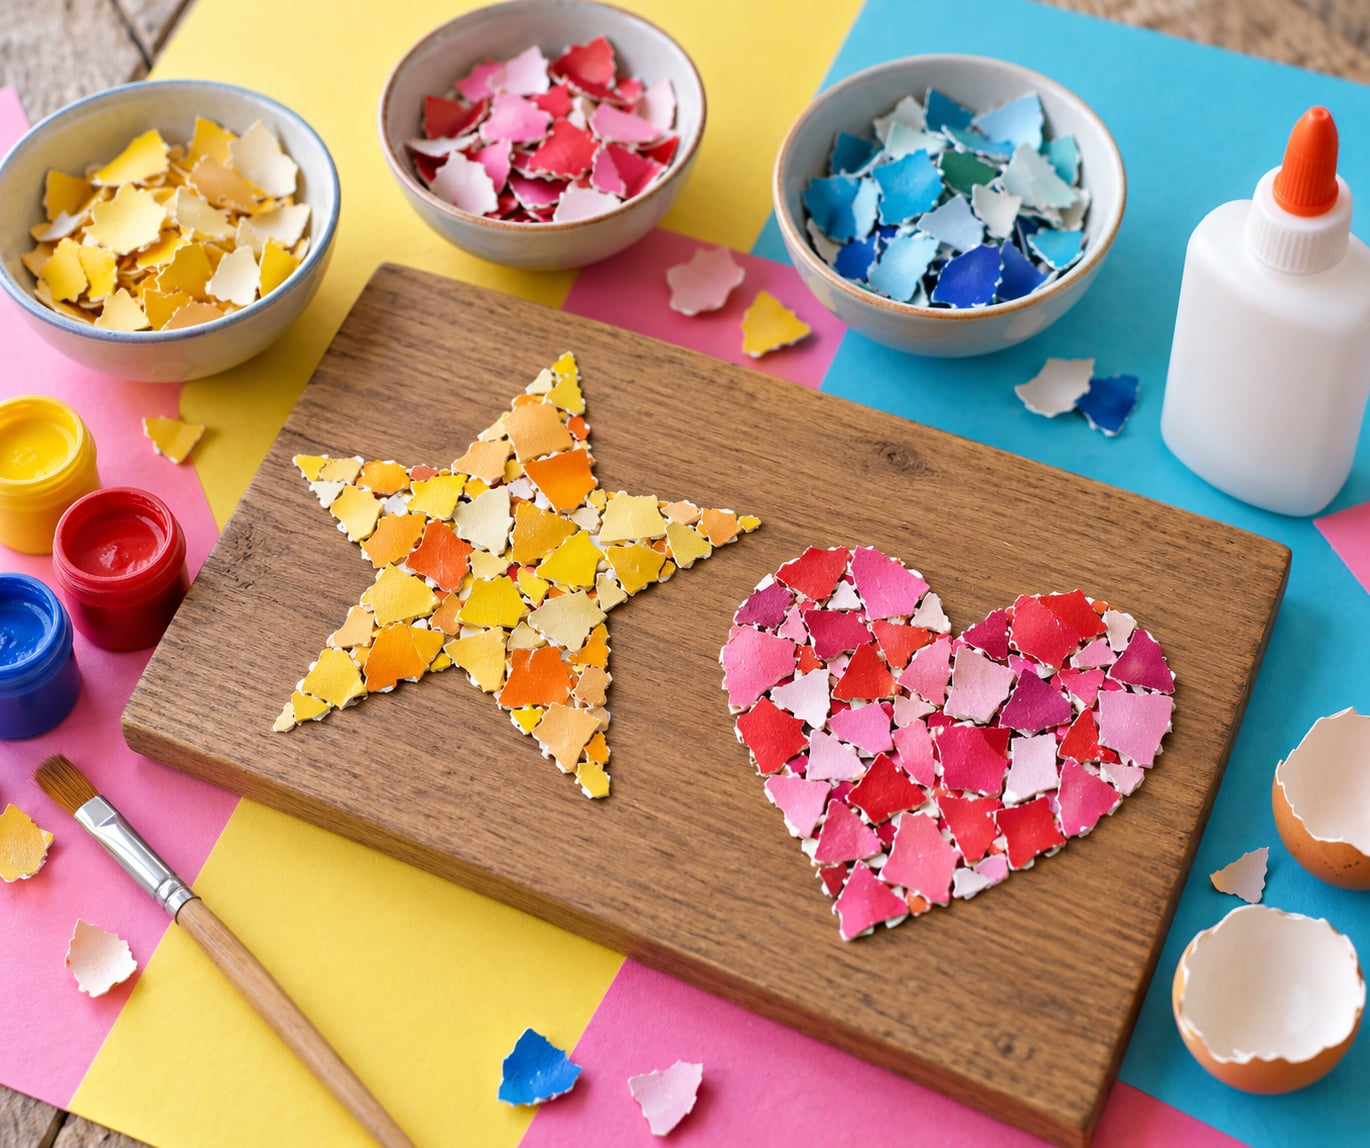
To make a mosaic with eggshells, you break clean, dried shells into tile-sized pieces, colour them, and glue them onto a painted board, paper or canvas. The base showing through the gaps does the work grout normally does, so there is nothing to mix. A framed piece takes about an hour of active work plus drying time, and the shells themselves are free.
That is the whole trick, and it surprises people. Eggshell is already a tile: curved, glossy, and slightly translucent at the edges. Break it up and it behaves like the small cut pieces, or tesserae, that a traditional mosaic is built from.
The technique is old. Japanese rankaku work fixes lacquer-soaked shell fragments onto wood, and some of those pieces are still intact centuries later. You do not need lacquer or a workshop, though. Kids, teachers and hobbyists all make workable versions with craft paint, a bottle of school glue and whatever board is in the cupboard.
One thing to sort out before you start: an eggshell mosaic is a decorative surface, not a functional one. Hang it on a wall, set it in a frame, or use it as a texture under mixed-media work. Do not build a tabletop, a floor tile or a garden stepping stone from it. Without a thick resin coating the shell stays brittle, and a footstep or a hot mug will find the weak spot.
Table of Contents
- 1What You Need
- 2Step-by-Step
- 3How to Prepare and Dry the Eggshells
- 4Plan the Mosaic Design
- 5Glue the Eggshell Pieces
- 6Add the Background or Grout
- 7Let the Mosaic Dry and Display It
- 8Common Mistakes
- 9Frequently Asked Questions
- 10Do I need to crush the eggshells for a mosaic?
- 11Can I make an eggshell mosaic on paper instead of wood?
- 12What glue works best for an eggshell mosaic?
- 13How long does an eggshell mosaic take to dry?
- 14What kind of designs are easiest for children to make?
- 15Conclusion
What You Need
Most of this list is already in your kitchen. A dozen eggs, a cup of water and a scrap of board cover the core of the project.
- Eggshells. Six to twelve for one small piece. Chicken shells are the easiest to work with. Save them over a few days and keep them in a jar, or boil the eggs straight from the fridge for a faster start.
- A base. A piece of plywood, a stretched canvas, thick cardboard, a picture frame with the backing removed, a small jewellery box lid, an air-dry clay tile, or heavy watercolour paper.
- Adhesive. PVA craft glue for children and paper bases. A gel glue such as B7000 or E6000 for wood and for pieces that need to hold their shape.
- Paint. Acrylic craft paint in two to four colours for the shells and one darker colour for the base.
- A small brush and a cup of water. For rinsing brushes, and for wetting the glue if it starts to thicken.
- Cutting tools. Nail scissors work better than a craft knife because the curved blade follows the curve of the shell. Add a small hammer, a pair of pliers or a nutcracker for breaking, and a toothpick or tweezers for placing.
- Optional hardener. One or two coats of gel nail topcoat or clear gel polish. Two thin coats are enough to stop shells shattering when you cut them.
- Finishing coat. A clear acrylic sealer, gloss varnish or clear spray sealant for the last step.
- Protective gear. Safety glasses for the crushing step, a newspaper-covered table, and an apron or old shirt for the painting.
Two extras earn their place more often than you would expect: a sheet of newspaper under the work to catch paint and crumbs, and a small brush dusted with a little mica powder, which adds sparkle as the piece dries.
Step-by-Step
Set aside ninety minutes for your first one, spread over two sessions. The work is not hard; it is unhurried, and rushing is what makes the mess.
How to Prepare and Dry the Eggshells
Wash the shells in hot soapy water, scrub away any dried white, and rinse. The shells are finished when the inside feels smooth and slimy rather than tacky, and when no white or yellow film clings to the surface.
Peel off the brown inner membrane while the shell is still damp. It comes away in strips from the wide end, and a thumbnail gets under the edge where a knife cannot. Any membrane you leave behind traps smell and stops paint sticking.
Dry the shells completely before anything else. Spread them on a towel in a warm spot, not in direct sun, and give them a day. A shell that feels even slightly cool to the touch still holds moisture, and it will crumble when you handle it.
Break the dried shells into flat chips about the size of a fingernail, then set the chips under something flat so you are working with pieces instead of curved halves. If chips snap into dust as you break them, the shells were not dry, or they are thin, and no amount of patience will fix that batch. A coat of gel topcoat, allowed to cure fully between coats, is the way to make stubborn shells workable.
Plan the Mosaic Design
Sketch the design lightly on the base before you glue anything, and keep it simple. Circles, hearts, stars, a fish, a letter or a border frame all work. A spiral or a checkerboard works too, and neither needs a drawing skill.
Choose three or four colours rather than a full tin. Narrow palettes are easier to read once the glue haze and the white cut edges are added, and a two-colour design has a built-in pattern: alternate light and dark, or use one colour in the background and a second for the shape.
Lay your dry chips out on the design before the first drop of glue. You are checking spacing, not perfection, because the point of a mosaic is that the pieces are not identical. Move anything that sits badly, then take a photo of the layout so you can rebuild it if a piece drops later.
Glue the Eggshell Pieces
Work in small sections, roughly a postcard at a time. Paint a thin layer of adhesive onto the base, set the piece down with tweezers, and press it once, gently.
One press is enough. Pushing harder is how shell pieces crack, and the crushed edges turn white and flatten the sparkle. Leave a gap of two or three millimetres between neighbours so the base colour reads as grout.
Add a small dab of glue directly to the back of a piece when the base is bumpy or already glued, instead of painting over the whole area. PVA needs a minute to grab, so let each section settle before you work next to it, and keep going before the glue skins over and stops sticking.
Add the Background or Grout
There is no need for real grout in an eggshell mosaic. The traditional alternative is to paint the base a contrasting colour before gluing, then let that colour show through every gap.
Two coats of acrylic paint, dried fully, do the job well. Choose a background darker than your shells so the pale pieces stand out, and remember that the cut edges of every shell show white, which a dark base hides and a light one emphasises.
If you want a grout effect after the fact, mix a little paint with a thin layer of white PVA, or use a premixed grout on a wood or canvas base. Take care with it around the shell pieces, and seal everything at the end either way. Leaving the gaps open and skipping grout entirely is a legitimate look, and a lighter one.
Let the Mosaic Dry and Display It
Give the piece a full 24 hours flat before you touch it, and another 24 before you seal it. PVA grabs within minutes but cures slowly, and lifting the work early is the most common reason tiles pop off later.
Brush on a thin coat of acrylic sealer or gloss varnish when the glue has cured, or use a spray sealant outdoors. Two light coats beat one heavy coat, which stays tacky and catches dust.
Wait another few hours, then check the surface with a fingernail in a corner. If it feels hard and smooth rather than soft or tacky, the piece is finished. Mount it on a wall, stand it on a shelf, or press it into an empty picture frame with a backing board behind it.
Common Mistakes
Shells shatter as you cut them. The fix is the hardener: two thin coats of gel topcoat with full curing time between them, and cutting with nail scissors rather than a craft knife. If the shell still breaks into dust, it was not dry.
Paint slides off or looks patchy. The pieces are still greasy. Wash and dry them again, remove every bit of membrane, and use acrylic paint rather than a washable tempera that beads on the surface. Two thin coats fix most patchiness.
Glue squeezes out from under the pieces. Use less glue, apply it to the back of the piece instead of the base, and wait for it to grab before pressing. Squeeze-out that cures turns hard and white, and it is nearly impossible to remove without disturbing the tile.
Pieces fall off after the project is finished. The glue cured on top while the base stayed slightly damp, or the work was lifted before the 24-hour mark. Re-glue loose pieces and give the whole piece a full curing period.
The design is hard to read. Too many colours and no contrast. Cut back to two, darken the background, and step back a metre from the piece to see what your eye actually picks out.
Edges look ragged. That is normal on shell, and it happens because the pieces are cut rather than moulded. Lay the flattest side up, fill gaps with more chips, and seal well.
A few habits make the whole project easier. Start on paper or cardboard rather than wood, because the mistakes cost nothing. Cut the shells after painting them if you are working with young children, since fewer snips means fewer crushed pieces. For a classroom, one class period is realistic for the gluing, with the shells prepared and dried the week before.
Hygiene matters too. Wash your hands and the work surface before and after, and keep the shells away from anything that will touch food. Disinfecting them with a diluted vinegar rinse after washing helps with smell, but the most reliable clean is soap, water and time.
Frequently Asked Questions
Do I need to crush the eggshells for a mosaic?
No. Crushing is optional and only suits abstract or background work, where small fragments read as texture. For most designs, break the shells into chips and cut those into larger pieces. Crushing makes the shell dustier, harder to control and slower to place, so save it for the second project.
Can I make an eggshell mosaic on paper instead of wood?
Yes, and paper is the easiest base for a first project. Use heavy watercolour paper or thick card rather than ordinary printer paper, which curls and tears when the glue goes on. PVA craft glue holds shell well on paper, and the finished piece works as a card, a poster or a page in an art journal.
What glue works best for an eggshell mosaic?
For children, paper and cardboard, standard PVA craft glue is enough and it is easy to clean up. For wood, canvas or anything that gets handled, a gel glue such as B7000 or E6000 grips the curved shell surface far better. Avoid hot glue, which sets too fast and leaves visible strings.
How long does an eggshell mosaic take to dry?
Plan on three stages. The shells need at least a day to dry after washing, glue needs a full 24 hours to cure before the piece is moved, and a sealer needs another few hours to harden. A whole session for gluing, then two calm days before the piece is finished, keeps the schedule realistic.
What kind of designs are easiest for children to make?
Large, simple shapes work best because each one is made of fewer, bigger pieces. Hearts, stars, suns, fish, flowers and single letters are ideal, as is a border running around a picture frame. A gradient that moves from one colour to another looks striking and asks for no drawing ability at all.
Conclusion
The easiest way to begin is to make one small piece on paper with a two-colour design. Wash and dry the shells properly, break them into chips, cut those into pieces, and paint the base darker than the shells so the gaps read as grout.
Sketch the design, test the layout, then glue section by section with one gentle press per piece. Leave it flat for a full day before sealing, and you will have a finished mosaic made from something most families throw away.