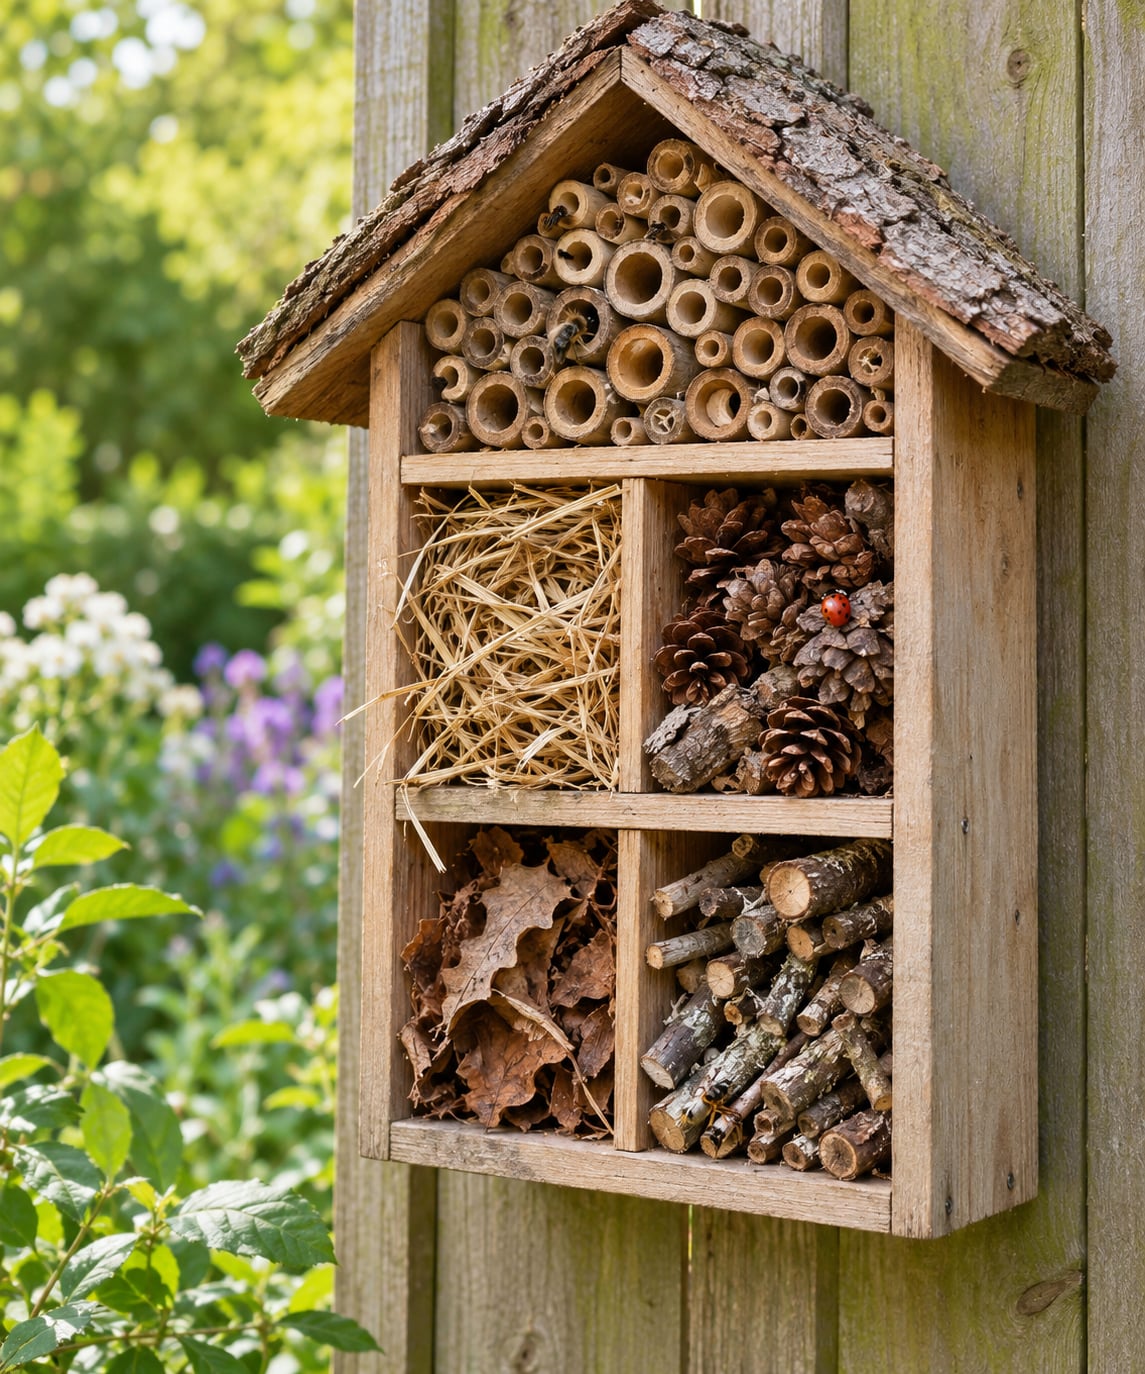
A bug hotel is a simple structure you fill with natural materials — hollow tubes, bamboo, pine cones, straw, twigs and bark — that gives insects a sheltered place to nest, rest or overwinter in your garden. To make one with kids, you need a box or wooden frame, a few natural fillings you collect on a walk, and about an hour. No glue gun required, though one helps.
The whole idea is that the insects find it themselves. You build the rooms, you fill them, you put it somewhere sensible, and then you watch. That watching part is what turns a craft into a science project, and it costs nothing.
Table of Contents
- 1What You Need
- 2Find these outdoors
- 3You will also need
- 4One safety note
- 5Step-by-Step: How to Make a Bug Hotel with Kids
- 6Plan the Bug Hotel
- 7Build the Frame and Compartments
- 8Add Natural Materials
- 9Decorate, Mount and Check the Hotel
- 10Common Mistakes to Avoid When You Make a Bug Hotel with Kids
- 11Frequently Asked Questions
- 12What materials are best for a kid-friendly bug hotel?
- 13Can children make a bug hotel without wood?
- 14Where should I place a bug hotel in the garden?
- 15How do I keep the materials inside the bug hotel dry?
- 16What insects might move into a bug hotel?
- 17Conclusion
What You Need
Split the list in two. The structural bits hold the hotel together; the natural bits are what actually welcome residents. Getting that split right is most of the project.
Find these outdoors
- Short lengths of bamboo or reed, ideally 10–20 cm
- Dry twigs and small sticks, a mix of thicknesses
- Pine cones, seed pods, or dry flower heads
- Peeling bark and curled leaves
- Dried grass, straw, or wool pulled from a fence
- Hollow plant stems — elder, bramble, teasel, fennel
- A few flat stones or a broken pot shard
You will also need
- A wooden box, a sturdy cardboard box, a wooden picture frame, or an old drawer
- Corrugated cardboard and a few thin offcuts of wood to make the dividers
- Staples or strong tape, plus string or wire for tying bundles
- Wire mesh or an old pair of tights to staple across the front
- Scissors, tape and paint for the decorating stage
Substitutions are easy. An oatmeal container, a shoebox or a plastic juice bottle cut across the middle all work as the shell. A sheet of stiff cardboard makes fine dividers, and garden twine replaces wire for lashing bundles.
One safety note
Staples, wire and sharp-edged cardboard are an adult job. If your child is under three, leave the cutting and stapling to you and hand them the paintbrush instead. From about eight, they can manage a staple gun under supervision; a craft knife or hot glue gun stays adult-only at any age.
Step-by-Step: How to Make a Bug Hotel with Kids
Plan the Bug Hotel
Decide the size first, because it decides everything else. For a garden wall or a fence panel, something roughly shoe-box sized works and you can carry it with one hand. For a free-standing build, make it about 60 cm tall and stand it on bricks or a post so the bottom compartment stays off the damp ground.
Wall-mounted or free-standing is a genuine fork in the road. Wall-mounted means no legs and less rot, but it needs a sheltered wall. Free-standing can sit in a border and be moved as the seasons change, which matters if you want spring pollinators one year and autumn hibernators the next.
Then get the children in on it. Ask them to decide the colours, cut out paper labels for each room, and collect the twigs. Handing over the collecting is the single best thing you can do — a walk that becomes a treasure hunt turns a build into an afternoon that fills up a whole weekend.
Build the Frame and Compartments
Fix the backing first. Plywood, hardboard or the flat side of a second piece of cardboard works, and staple or tape it to the back edge of your frame with no gaps at the bottom where a wasp could build a nest you did not ask for.
Divide the interior with cardboard or thin wood strips. Make the compartments deliberately different sizes rather than neat and equal — tall and narrow, short and square, wide and shallow. Variety is what lets several species share one wall, because each insect has its own gap size it will accept.
Staple wire mesh or an old pair of tights across the front once everything is filled. It keeps birds and squirrels out, and it stops curious fingers pulling the rooms apart. This step gets skipped more than any other, and it is the one most worth doing.
Add Natural Materials
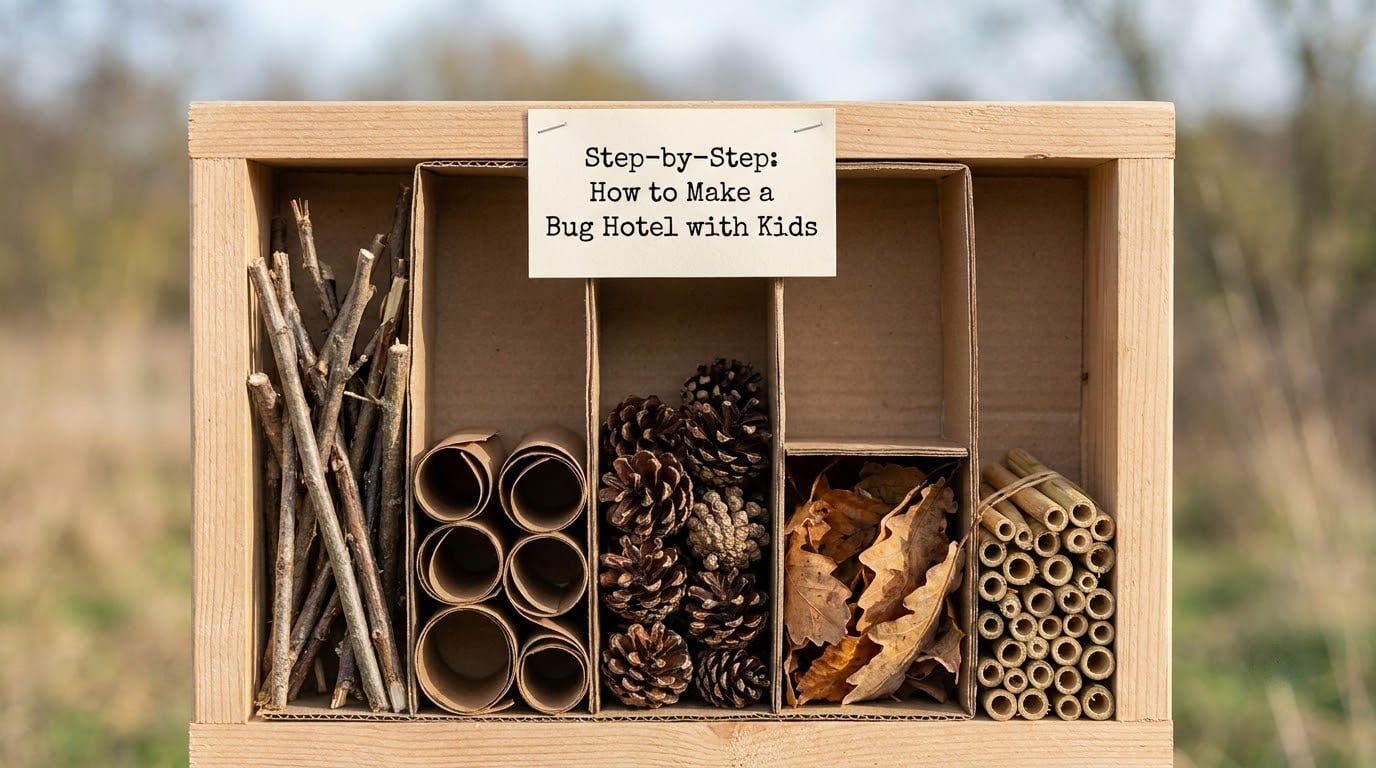
Fill each compartment with one material, packed loosely rather than jammed tight. If nothing can squeeze in beside the twigs, nothing will move in. Pack bundles with their ends facing outward so the openings are visible, and vary the depth so there is darkness at the back of every room.
Here is the mapping worth having in your head, because each material suits a different resident:
| Filling material | Gap size that works | Likely resident |
|---|---|---|
| Bamboo or reed tubes | 3–8 mm wide | Solitary bees, leafcutter bees, small wasps |
| Drilled holes in a wood block | 3–6 mm deep, cleaned out | Solitary and mason bees |
| Tied bundles of straw | Tube gaps along the stems | Earwigs and other overwintering invertebrates |
| Pine cones | Natural crevices | Ladybirds and small beetles |
| Twig bundles | Mixed diameters | Solitary bees, wasps, caterpillars pupating |
| Peeling bark and curled leaves | Underneath | Woodlice, beetles, larvae |
| Hollow plant stems | 3–10 mm wide | Bees, hoverflies and other hangers-out |
| Stones and pot shards | Flat cool surface | Ground beetles, worms |
If bees are your target, drop the twig compartment and make a bee hotel instead. Drill or buy blocks of untreated wood or clay pipe, and cut holes in five sizes: about 2 mm for the tiniest solitary bees, 3–4 mm for leafcutter and mason bees, 6 mm for larger solitary bees, 8–10 mm for bigger species. Two rules matter more than the rest: never drill partway through and leave a blind hole, and never use pressure-treated wood, which is toxic to larvae.
Steer clear of a few fillers. Food scraps and anything with a smell attract flies rather than the insects you hope for, and in winter those flies sit in the warm sun and die on the floor of the hotel. Skip nuts and acorns for the same reason, skip plastic, and skip anything treated, scented or sharp. If you can pick it up from a path and it does not sting or bleed sap, it is probably fine.
Decorate, Mount and Check the Hotel
Let the kids paint the outside, add door-shaped cutouts, and label each room with a picture of what is inside. Children who recognise their own handwriting go back to check far more often than children who watched an adult do it.
Position matters more than almost anything else in this project. Aim for a sheltered spot with some sun, ideally south or west facing, near flowers or long grass, but out of the worst of the wind and not in a line of dripping eaves. Leave it in place over winter rather than moving it into a shed.
To keep the rain off, angle a small roof of slate, a plastic sheet on two sticks, or a piece of bark over the top. Do not seal the sides; ventilation is what stops mould, and mould is the one thing that will actually ruin a hotel.
When you check, keep it to a count through the mesh. Look at what is in the tubes, note what changed in a bug journal, and leave the residents where they are. The one time I lifted a fitting out to look properly, it was an empty tube with a spider silk tie across it — which is the reminder that you are building a home for wild things, not a display case.
A reasonable timeline: something often appears within a day or two, but solitary bees and overwintering insects may take a month or more, and an empty hotel in week three is completely normal. If it is still empty after a month, the usual causes are a spot in full afternoon sun that bakes dry, a gap the wrong size, or a front that never had mesh.
Common Mistakes to Avoid When You Make a Bug Hotel with Kids
These are the five things that go wrong most often, with the fix for each.
- Damp materials. Anything green or fresh will grow mould inside a closed box. Dry everything thoroughly first, and never fill a compartment with fresh-cut stems or clippings from the lawn.
- Compartments packed solid. Stems shoved in too tight leave no room at all. Fit bundles so they sit loosely and you can slide a finger in beside them.
- Direct rain on the whole face. A small roof solves this and costs one sheet of bark. Rain also washes out the nesting material, so it stops being usable at all.
- No ventilation and no mesh. One makes mould, the other invites squirrels and birds. You need a covered front that still lets air move around the edges.
- Expecting tenants on a deadline. Empty rooms in week one are normal. Do not keep swapping the contents out, which resets the whole thing.
To make it last longer, stand it off the ground, refresh the straw and leaf compartments each autumn, and top up the bamboo and twigs as they wear down. Rotate a little material each year so the mix stays interesting rather than turning into a single colony of whatever moved in first.
Frequently Asked Questions
What materials are best for a kid-friendly bug hotel?
Hollow bamboo or reed tubes, tied bundles of dry straw, pine cones, dry leaves, peeling bark and mixed twigs make the best fillings. Each one suits a different resident, which is why a varied mix works better than piling in one material. Collect them dry, from paths and hedges, and leave out anything green, mouldy or treated.
Can children make a bug hotel without wood?
Yes. A sturdy cardboard box, an oatmeal container or a plastic juice bottle cut in half all work as the shell, with stiff cardboard strips as dividers. Paint or decorate the outside first so the cardboard holds together better. For the bee-hotel version you do need drilled wood or clay pipe, because bees will not use cardboard tubes.
Where should I place a bug hotel in the garden?
Choose a sheltered spot with some sun, ideally south or west facing, close to flowers or long grass but out of the strongest wind. Keep it clear of dripping eaves and off the soil, where damp causes mould. Leave it in the same place over winter rather than moving it into a garage, and mesh the front so squirrels cannot strip it.
How do I keep the materials inside the bug hotel dry?
Dry every filling thoroughly before it goes in, add a small roof of bark, slate or a plastic sheet on two sticks, and never pack the compartments solid so air can circulate. Avoid green stems and fresh garden clippings, which rot and grow mould inside the box. Check after heavy rain and lift out any soggy material within a day or two.
What insects might move into a bug hotel?
Small tubes attract solitary bees, leafcutter bees and some small wasps. Pine cones shelter ladybirds and beetles, straw bundles suit earwigs, and bark, leaves and stones draw woodlice, beetles and worms. Some guests are useful predators, but stinging insects can also move in, so place it where children can see it without reaching it.
Conclusion
Start with a cardboard box and a walk. Collect twigs, tubes, cones and bark with your kids, dry everything overnight, then build the frame and fill each room with a single material, packed loosely. Mesh the front, add a small roof, and put it somewhere sheltered with sun near flowering plants.
Then do the part most guides skip: look without disturbing. Count arrivals, note the date each resident appears, and leave them where they are. Learning how to make a bug hotel with kids works best as an invitation to watch what a small patch of garden can do on its own.