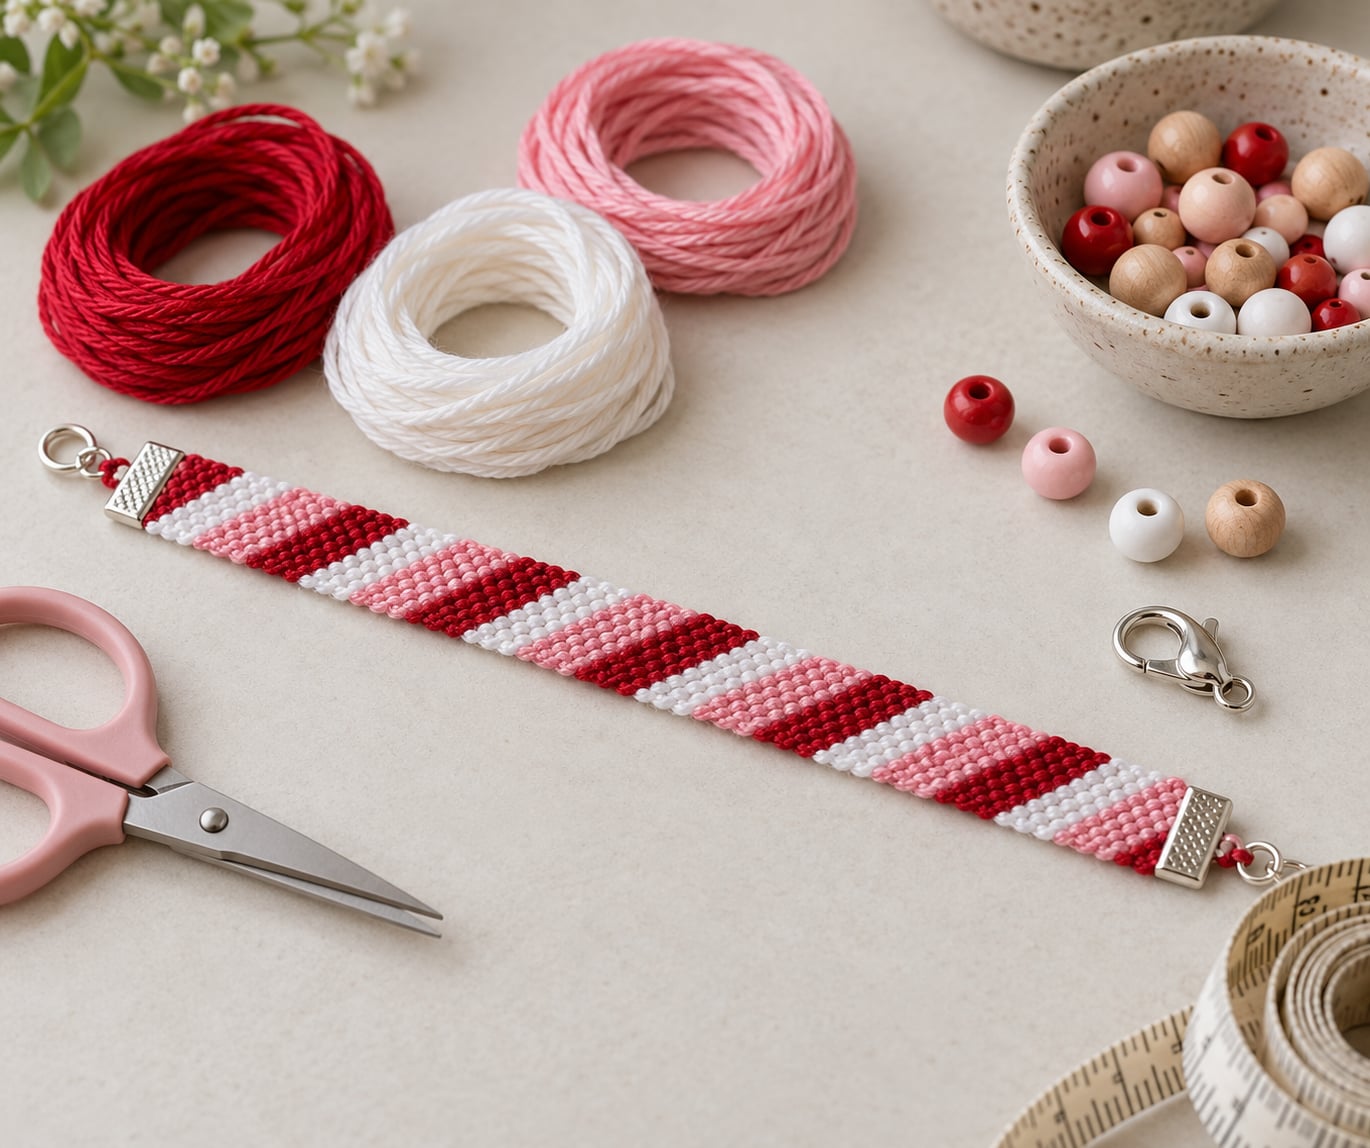
A candy stripe friendship bracelet is a flat woven band made by tying knots across 4 to 8 strands of embroidery floss, so each strand becomes one diagonal stripe of color. Learning how to make a candy stripe friendship bracelet takes about 30 to 60 minutes, uses no tools beyond scissors and a bit of tape, and is the friendliest first pattern a kid or beginner can tie. It is genuinely beginner friendly: the whole pattern is one knot repeated in a set order, so you never have to guess what comes next.
The strip look comes from moving the same strand across the row every time you finish it. Keep reading and you will have the materials list, the knot explained in words, six numbered steps, and fixes for the problems that trip up most first attempts.
Table of Contents
- 1What You Need
- 2Step-by-Step
- 31. Measure the Wrist and Cut the Cord
- 42. Choose a Candy Stripe Color Order
- 53. Build the Candy Stripe Friendship Bracelet Pattern
- 64. Tie the Beads and Continue the Stripes
- 75. Finish and Trim the Bracelet
- 86. Check the Fit and Make the Matching Pair
- 9Common Mistakes
- 10Frequently Asked Questions
- 11What is the easiest way to make a candy stripe friendship bracelet?
- 12Can children make this bracelet without small beads?
- 13How many friendship bracelets should I make at the same time?
- 14Should I use a clasp or tie the bracelet with string?
- 15How do I stop the woven strands from becoming loose?
- 16How can I personalize a candy stripe friendship bracelet?
- 17Start with the Color Order
What You Need
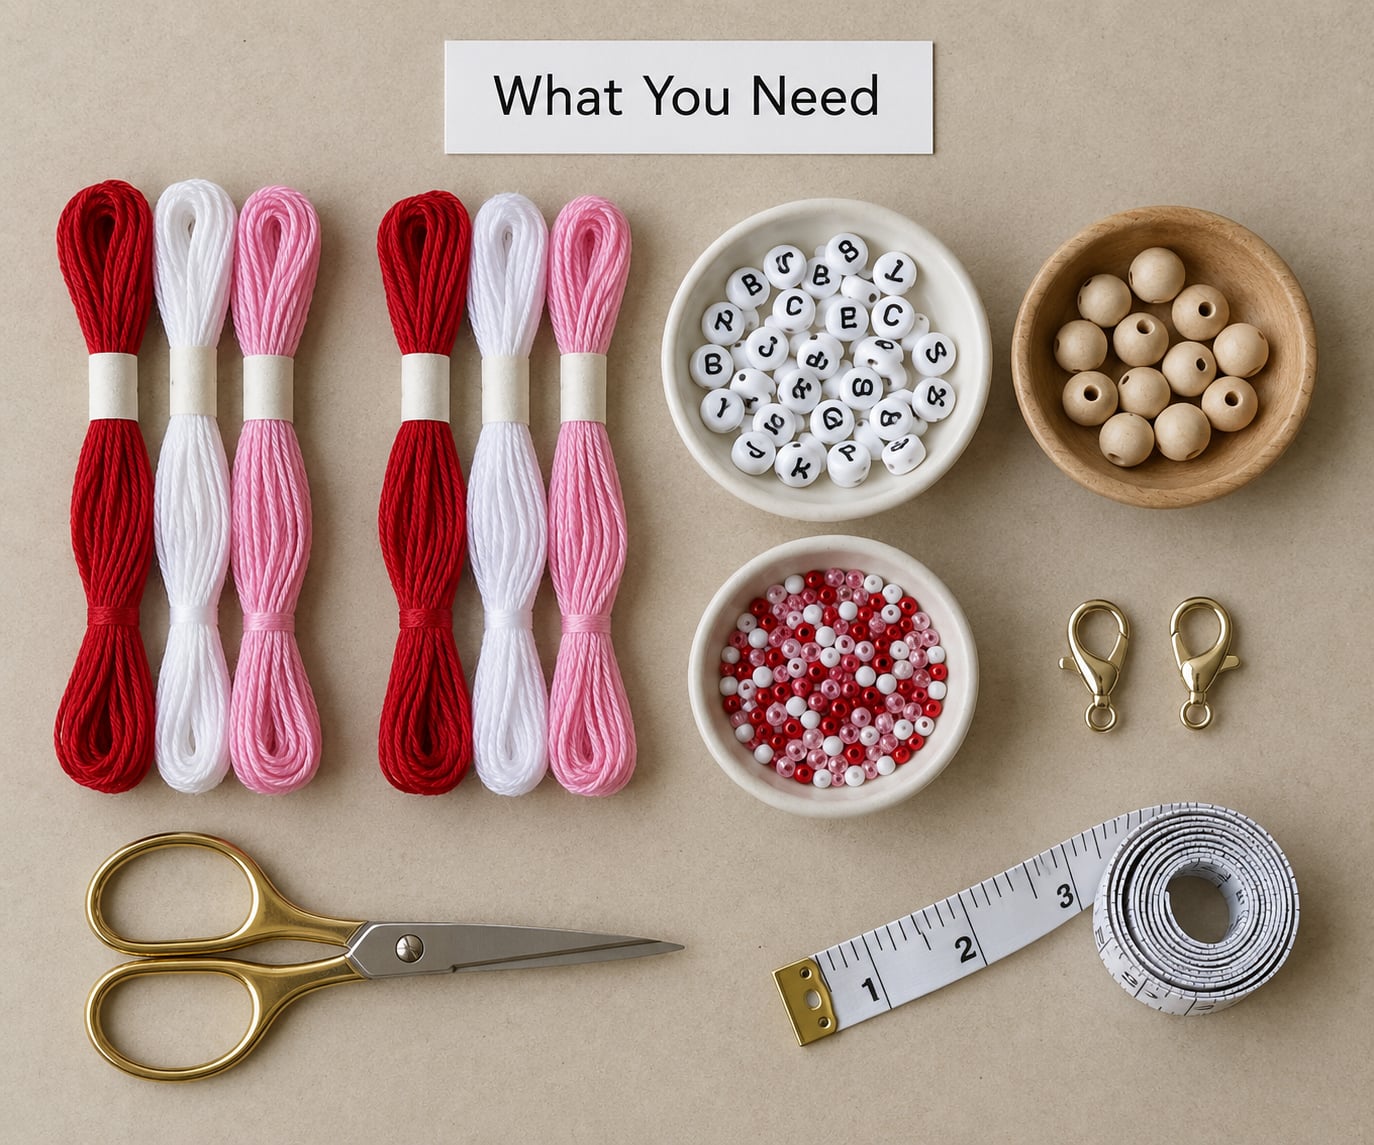
Gather everything before you cut anything. Having the strands laid out in order on the table saves the most frustrating part, which is re-threading a tangled knot.
- Embroidery floss — 4 strands for a slim classic stripe, 6 for a wider band, 8 for a chunky one. Cut about 36 inches per strand, roughly fingertip to shoulder for most kids and adults.
- Scissors — small sharp craft scissors cut floss cleanly. Dull scissors crush the fibers and the ends fray later.
- Masking tape or a clipboard — tape the top of the strands to the table, or clip the tails to a clipboard, so both hands stay free.
- A ruler or tape measure — to cut equal strands and to check the finished length.
- Beads, optional — wooden beads, alphabet beads or pony beads. Skip them entirely and the pattern still works.
- A clasp, optional — a lobster clasp or a key ring makes the bracelet adjustable and giftable.
For children under three, leave beads out completely, since anything small enough to thread on floss is small enough to swallow. For kids roughly three and up, supervise the cutting and the knots, and expect a few strands to need re-threading. Long hair is the other thing worth tying back before anyone starts knotting.
Step-by-Step
1. Measure the Wrist and Cut the Cord
Wrap a piece of thread around the wrist just above the bone, mark where the ends meet, and measure that length. A finished bracelet should sit at that measurement plus about 2 inches, because the woven section shrinks as you pull the knots tight.
Add 3 inches for the starting knot and 4 inches for the finishing knot, then cut every strand at exactly the same length. Lay the strands side by side in your chosen color order and tape the top inch to the table, leaving the tails free below the tape. You know it worked when you can fan the strands out and tap them on a table and they stay in the same order.
2. Choose a Candy Stripe Color Order
Pick the order once and write it down as letters, for example A red, B white, C pink, D white. Candy stripe looks best with one strong color and one light color alternating, because the contrast is what makes each stripe read as separate.
Label your strands from left to right as A, B, C and D, and never move a strand from its place. If you are making two bracelets for a friend, line up all eight strands in two rows and repeat the exact same letter order in both. You know the order is right when every stripe in one bracelet has the same color in the same position as its match.
3. Build the Candy Stripe Friendship Bracelet Pattern
Tie all the strands together in one overhand knot about 1 inch from the taped end. That knot is your starting knot and the short leftover length below it is the tail you keep for finishing.
The only knot this pattern needs is the forward knot. Lay strand A across the top of the next strand to the right, cross it over to make a loop that looks like the number 4, tuck the working end through the loop from underneath, then pull both ends of strand A sideways to tighten. Now lay strand A across the next strand to the right and do the exact same thing again.
Keep going until strand A sits at the far right, one knot past every strand it passed. That is one finished stripe. The new leftmost strand becomes the working strand, and you repeat the whole sequence with it.
You know the first stripe worked when the bracelet lies flat on the table, the woven part has no visible gaps, and strand A has moved from the far left to the far right exactly as planned.
4. Tie the Beads and Continue the Stripes
If you are using beads, string one onto the working strand before you tie the first knot of that stripe. Beads sit nicely between stripes rather than inside one, so the stripes stay readable.
Pull every knot sideways instead of upward. Upward pulling tightens one strand and leaves the other loose, and uneven tension is the main reason a homemade bracelet curls. Before each stripe, run your fingers down all the strands and straighten them, then check that the working strand is the leftmost one.
You know the weaving is tight and aligned when the stripes run in clean diagonal lines, the top edge is straight, and the strand order still reads A, B, C, D after every row.
5. Finish and Trim the Bracelet
Stop when the woven length matches your wrist measurement. Tie the top two strands together in an overhand knot, then tie the bottom two strands to each other and to the pair above them. Repeat that second knot twice more so nothing slides.
If you added a bead at the end, thread it onto both finishing strands before those last knots so the bead locks in place. Trim the tails to about a quarter inch, then ask an adult to help with the final snip if the scissors are the sharp kind, and to attach a clasp with pliers if you are using one.
6. Check the Fit and Make the Matching Pair
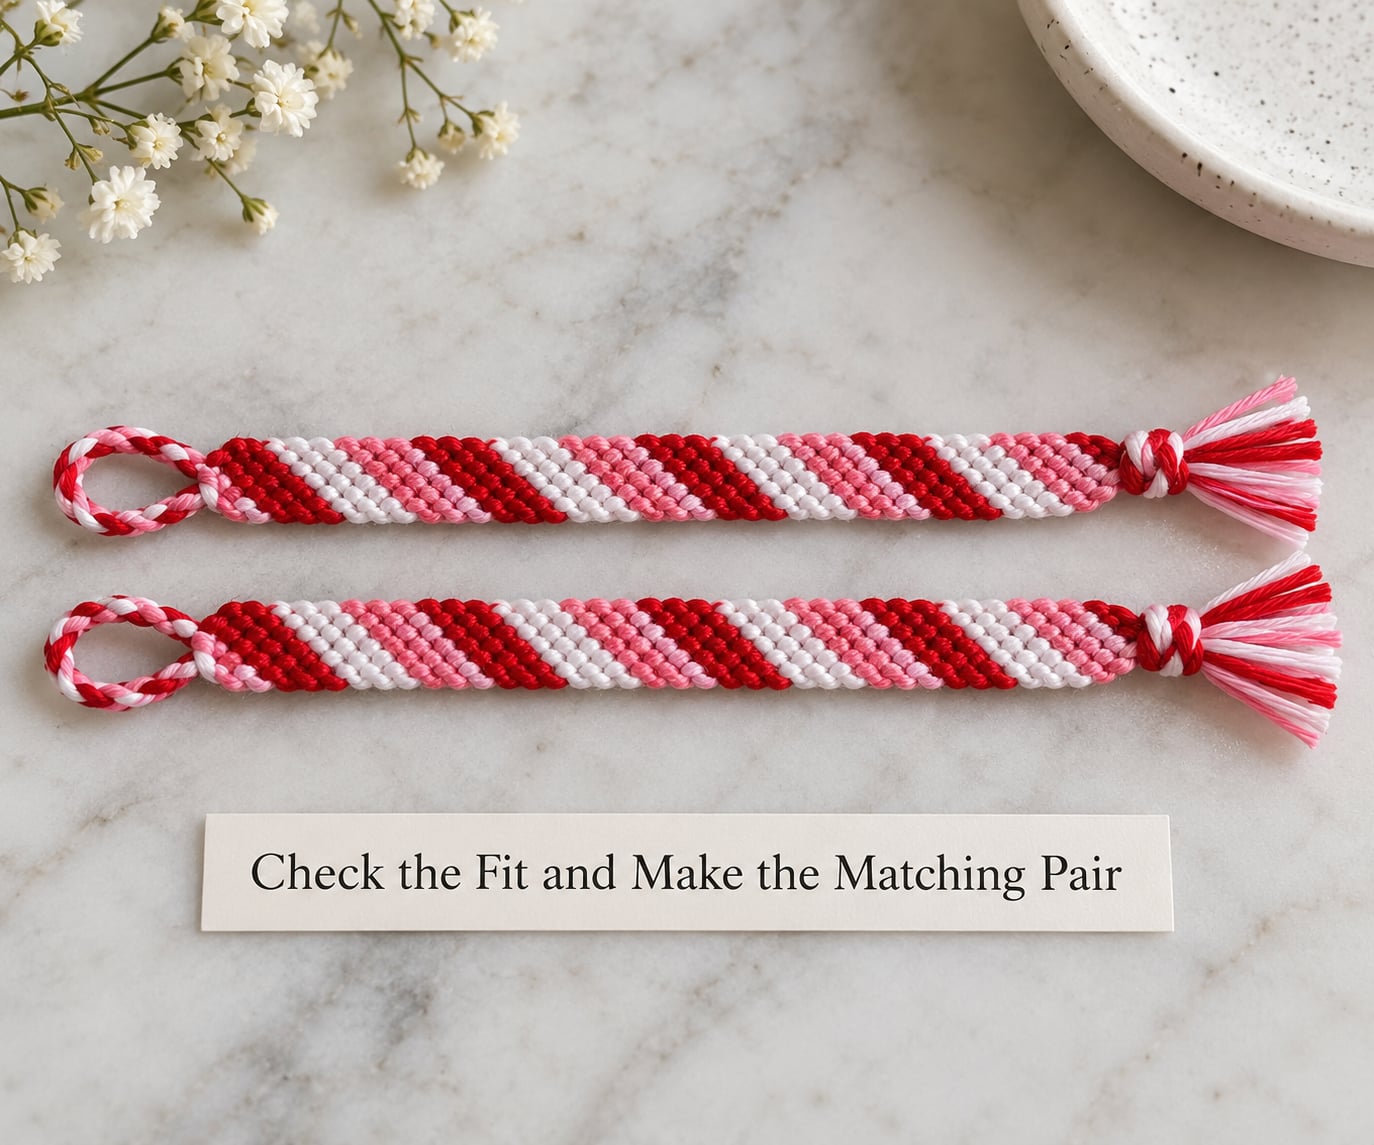
Slide the bracelet over the hand and onto the wrist. It should rest snug at the bone with no gap and not slide past the heel of the hand. If it is too tight, undo the last two knots and shorten the tails; if it slips, add a half inch to the starting length next time.
Now make the second bracelet using the same letter order, the same strand count and the same number of rows. Matching bracelets only look identical when the finished lengths match too, so lay them flat together and trim the longer one back a row if needed. Tying one onto your friend takes two sets of hands, which is the whole point of the project.
Common Mistakes
- The weaving comes out loose. Pull knots sideways, not up, and tug the woven section down after every row. Loose weaving usually means upward pulling.
- Stripes look uneven or fuzzy. You probably lost count mid-row. Untangle the working strand, spread the bracelet flat on the table and count the knots in the finished stripe before continuing.
- You ran out of cord. Length was measured before shrinking. Cut strands 3 inches longer than the finished length you want and check the fit before the last row.
- Beads slide toward one end. Tie a knot above and below the bead, and add a tiny drop of clear craft glue on the cord if the hole is wider than the cord.
- Knots are hard to pull tight. Shorten your working strand by an inch after every few rows, and moisten the floss slightly with a drop of water if it is dry and fuzzy.
- The bracelet twists. Keep all strands hanging forward and untwisted, and finish with two forward knots on each outside strand so the ends spiral instead of roll.
- It feels uncomfortable after an hour. Make it half an inch longer and add a clasp so you can loosen the fit, and stop tightening once the stripes are even.
Frequently Asked Questions
What is the easiest way to make a candy stripe friendship bracelet?
Use four strands of embroidery floss, tie them together in one overhand knot, and tie forward knots with the leftmost strand across every strand to its right until it reaches the far side. Repeat with the new leftmost strand. That single move is the whole pattern, and the bracelet takes 30 to 60 minutes.
Can children make this bracelet without small beads?
Yes, and it is the easier version. Beads are optional decoration, so leave them out and the stripes still read clearly. Kids under three should skip beads entirely because they are a choking risk. For everyone else, an adult should handle the scissors and supervise the knotting.
How many friendship bracelets should I make at the same time?
Two at a time is the practical limit for most beginners. Line up eight strands in two rows of four, repeat the identical color order, and work both bracelets side by side so the stripes match. Making four at once is possible but doubles the strands on the table and makes them easy to tangle.
Should I use a clasp or tie the bracelet with string?
A clasp is better if you want the bracelet to fit more than one wrist or give it as a gift, and it is the only option if you cut the strands short. Tying with string works fine for a bracelet made for one specific wrist, and it costs nothing extra. Either way, finish with three overhand knots before trimming.
How do I stop the woven strands from becoming loose?
Pull each knot sideways rather than upward, and squeeze the woven section gently downward after every row. Untangle and straighten all the strands before you start a new stripe. If the floss feels dry and rough, a drop of water along the row tightens it noticeably.
How can I personalize a candy stripe friendship bracelet?
Add one letter bead per wearer at the clasp so each bracelet reads as a name. You can also swap one color in the order for something personal, or tie a second thinner strand around the middle in a single solid color as a band. Personalize only after the base pattern is finished, and the stripes stay even.
Start with the Color Order
Measure the wrist first, then choose a color order and write it down before a single strand is cut. Repeat that same order for the second bracelet, pull every knot sideways, and only add beads, clasps or decoration once the base weave is finished and lying flat.
Learning how to make a candy stripe friendship bracelet teaches the one knot that every other bracelet pattern is built from, so the next one feels shorter than this one did.